
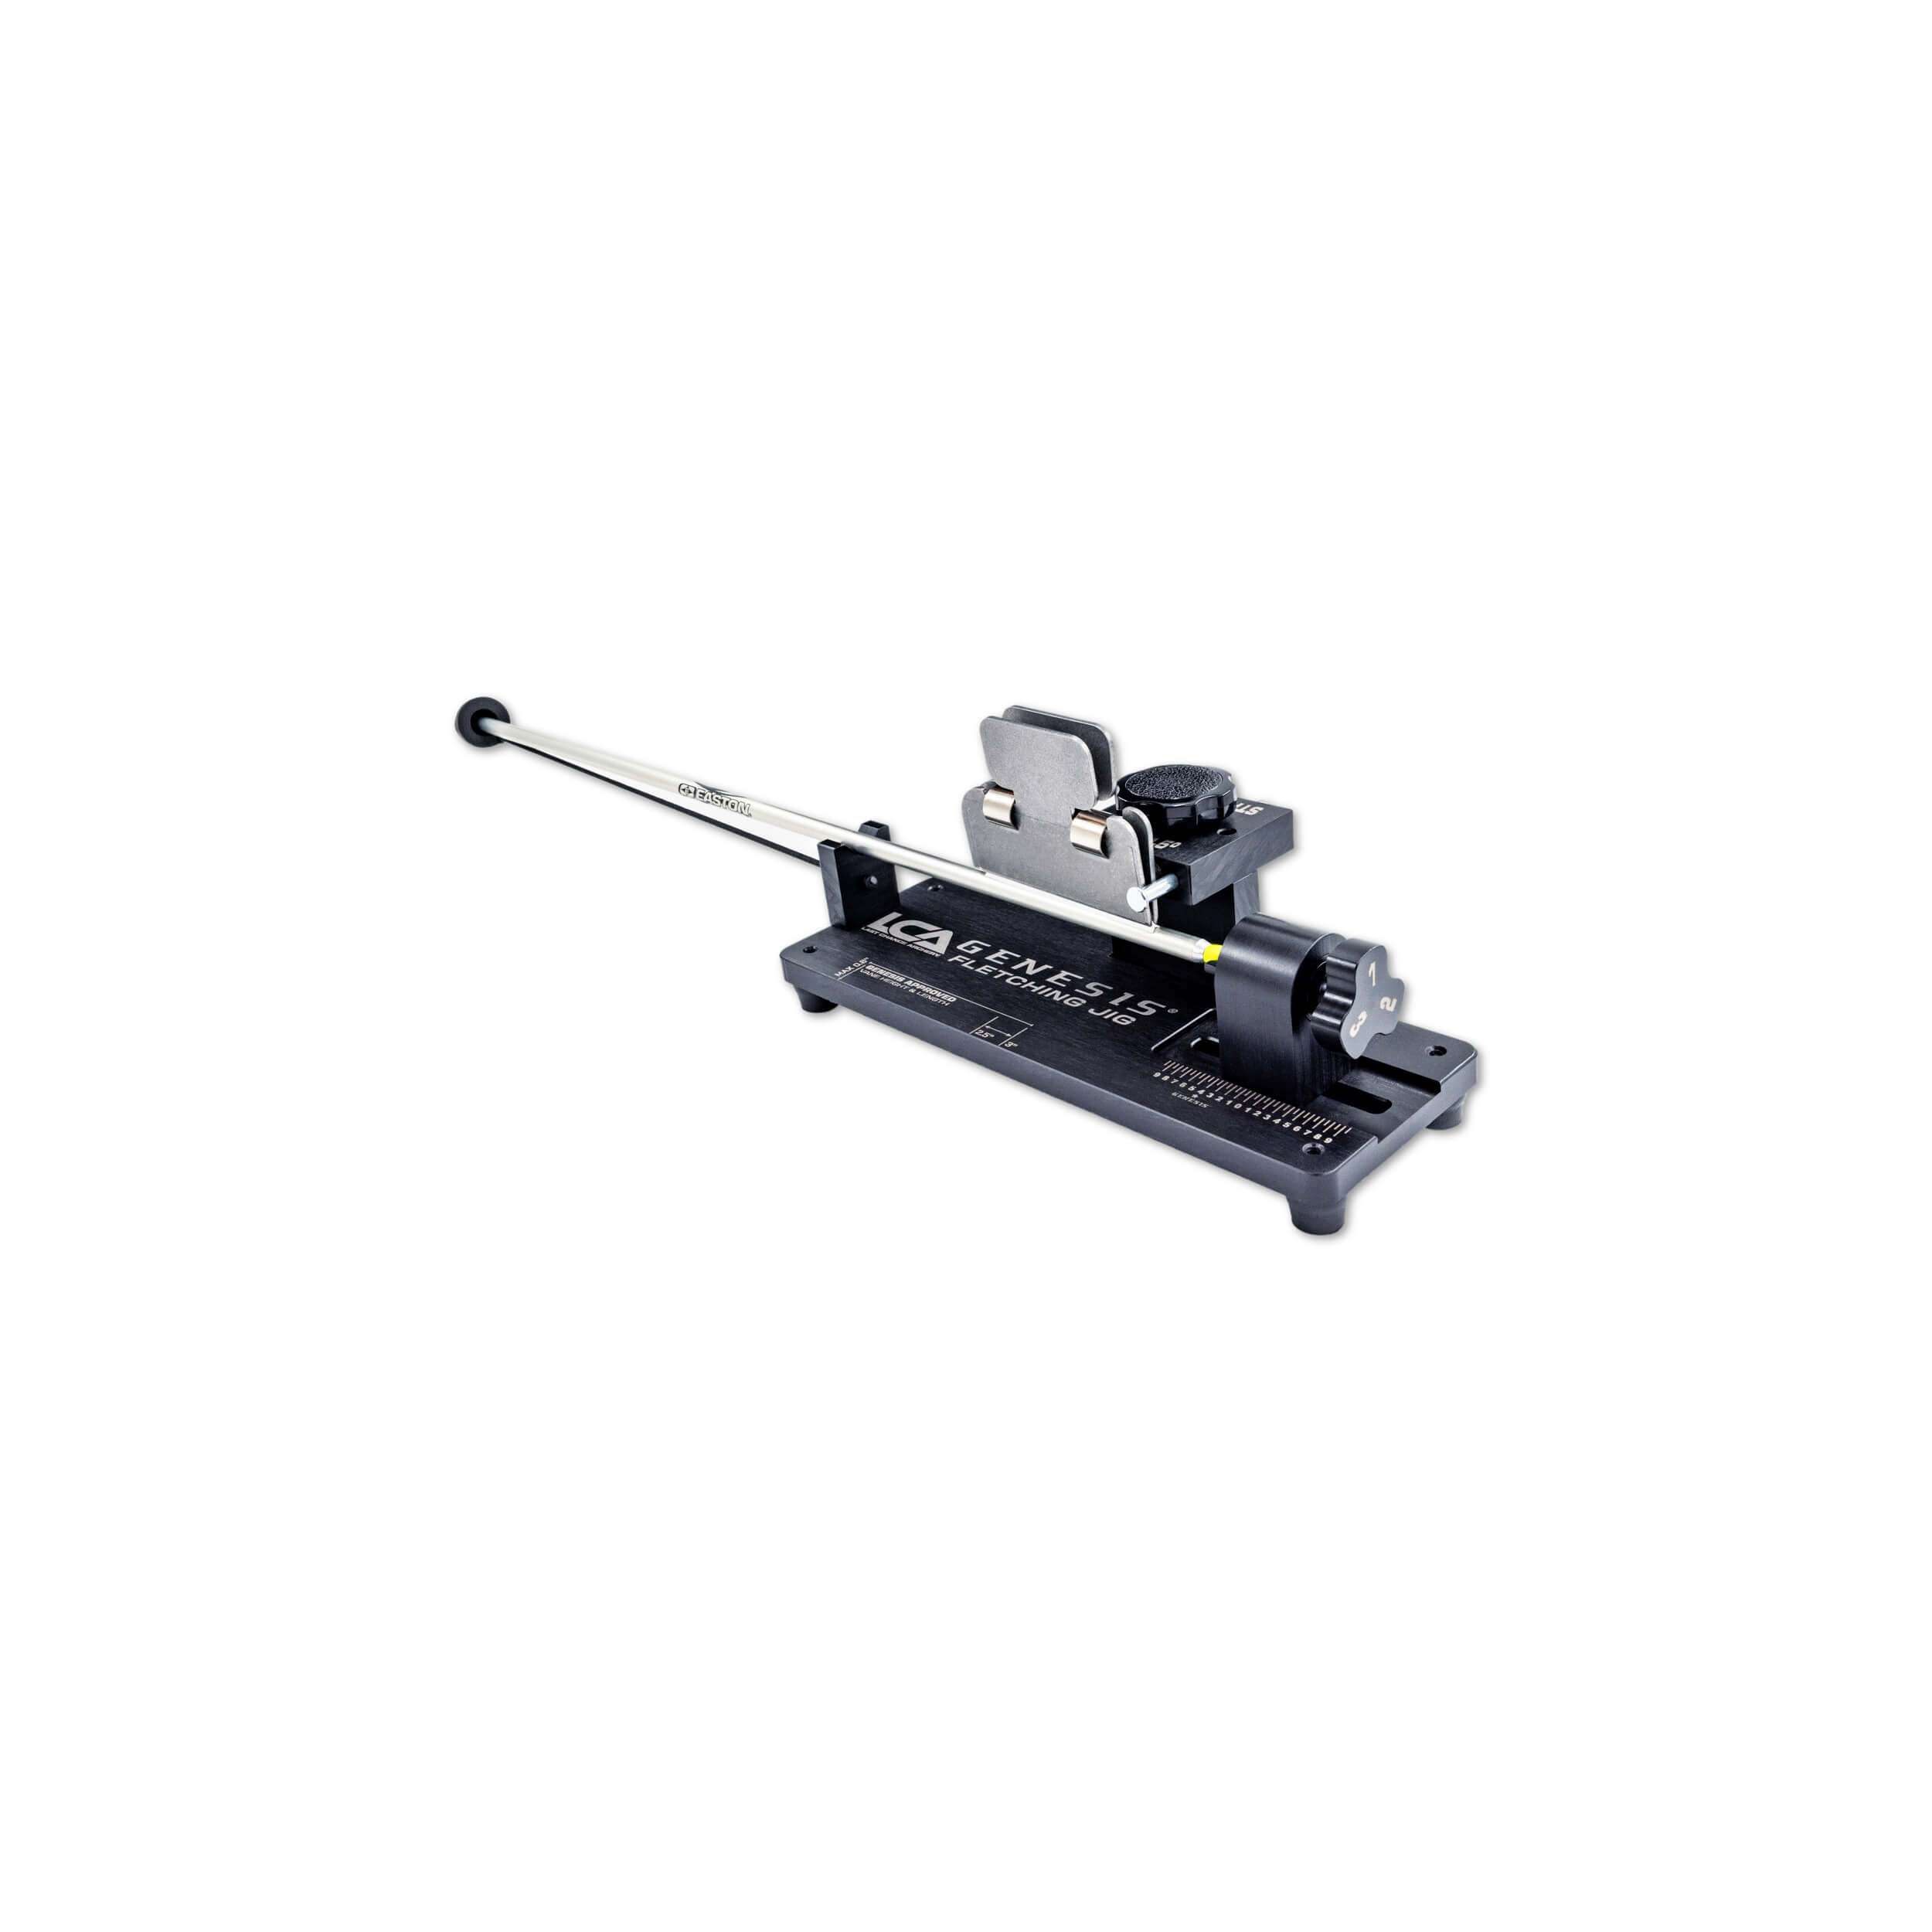


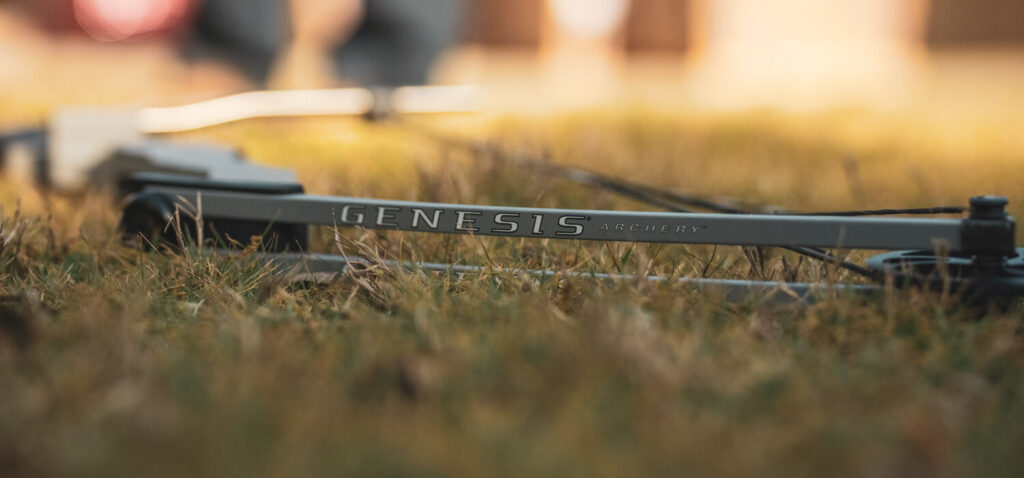
Genesis Fletching Jig
$129.00
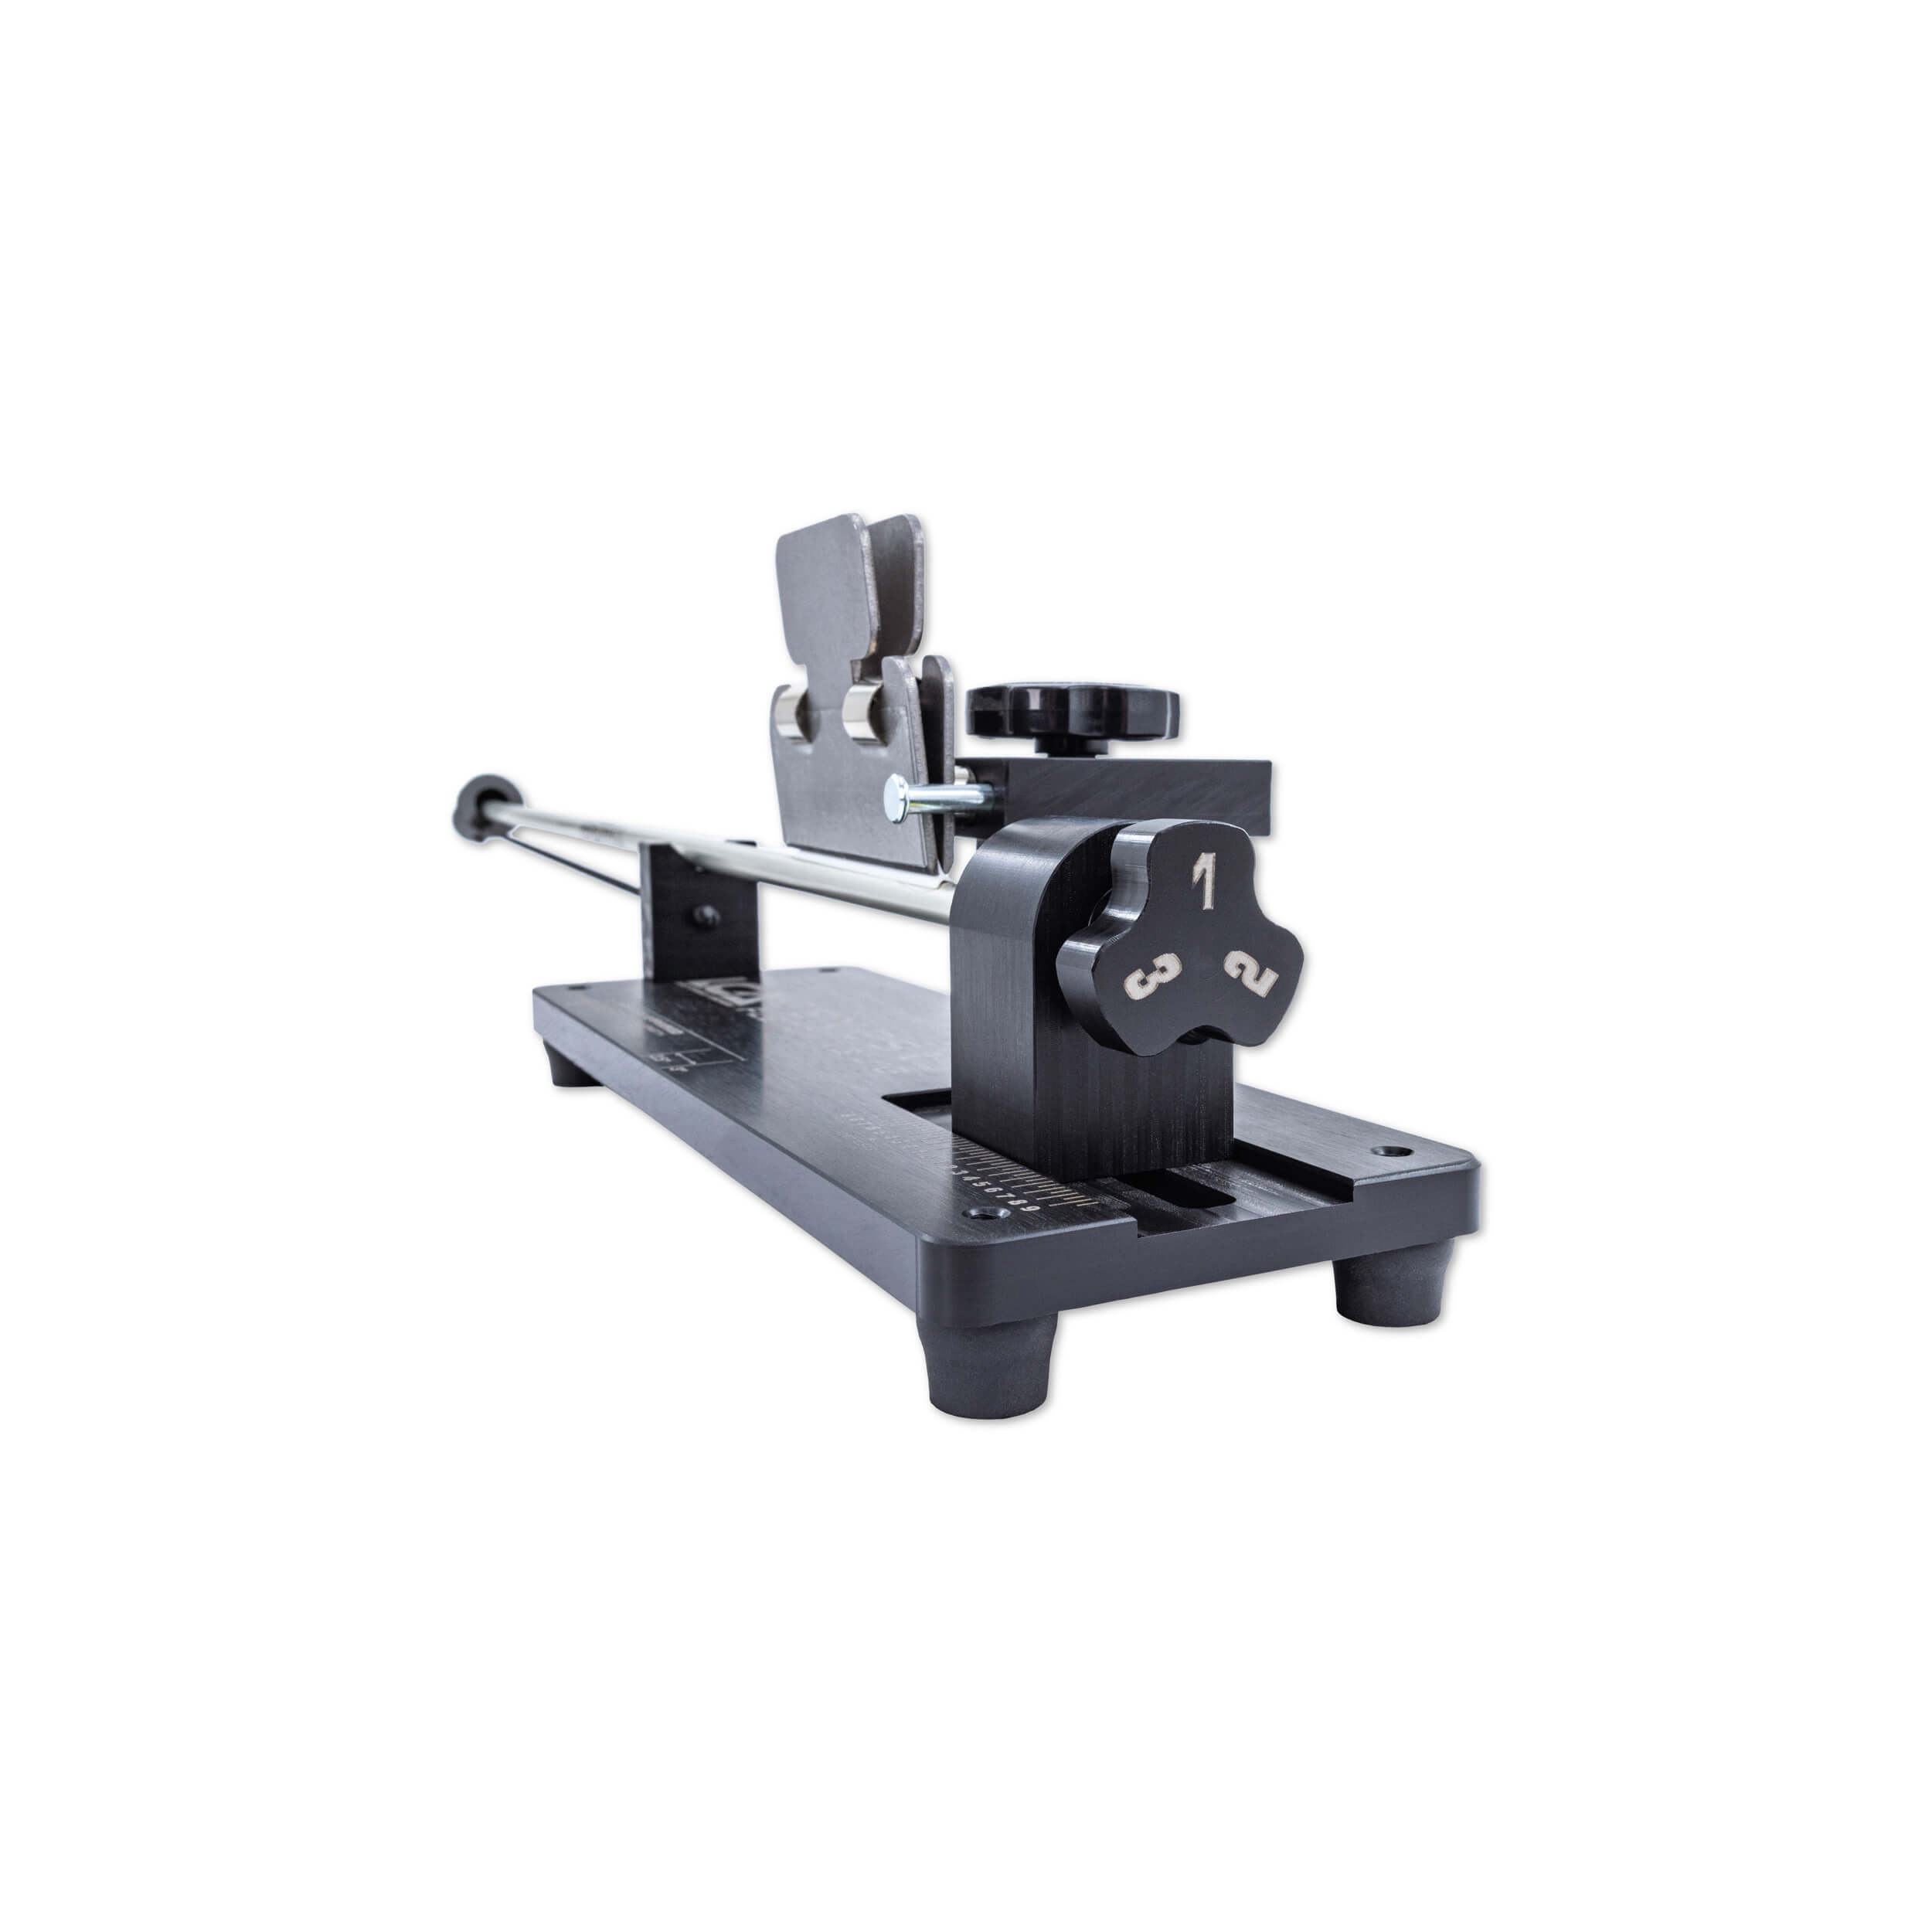
Compatible with any arrow diameter, standard nock styles, and any vane or feather up to 3 inches long, the Genesis Fletching Jig delivers precise, repeatable vane placement for target archers, bowhunters, youth shooters, schools, clubs, and anyone looking to build consistent, high-quality arrows.
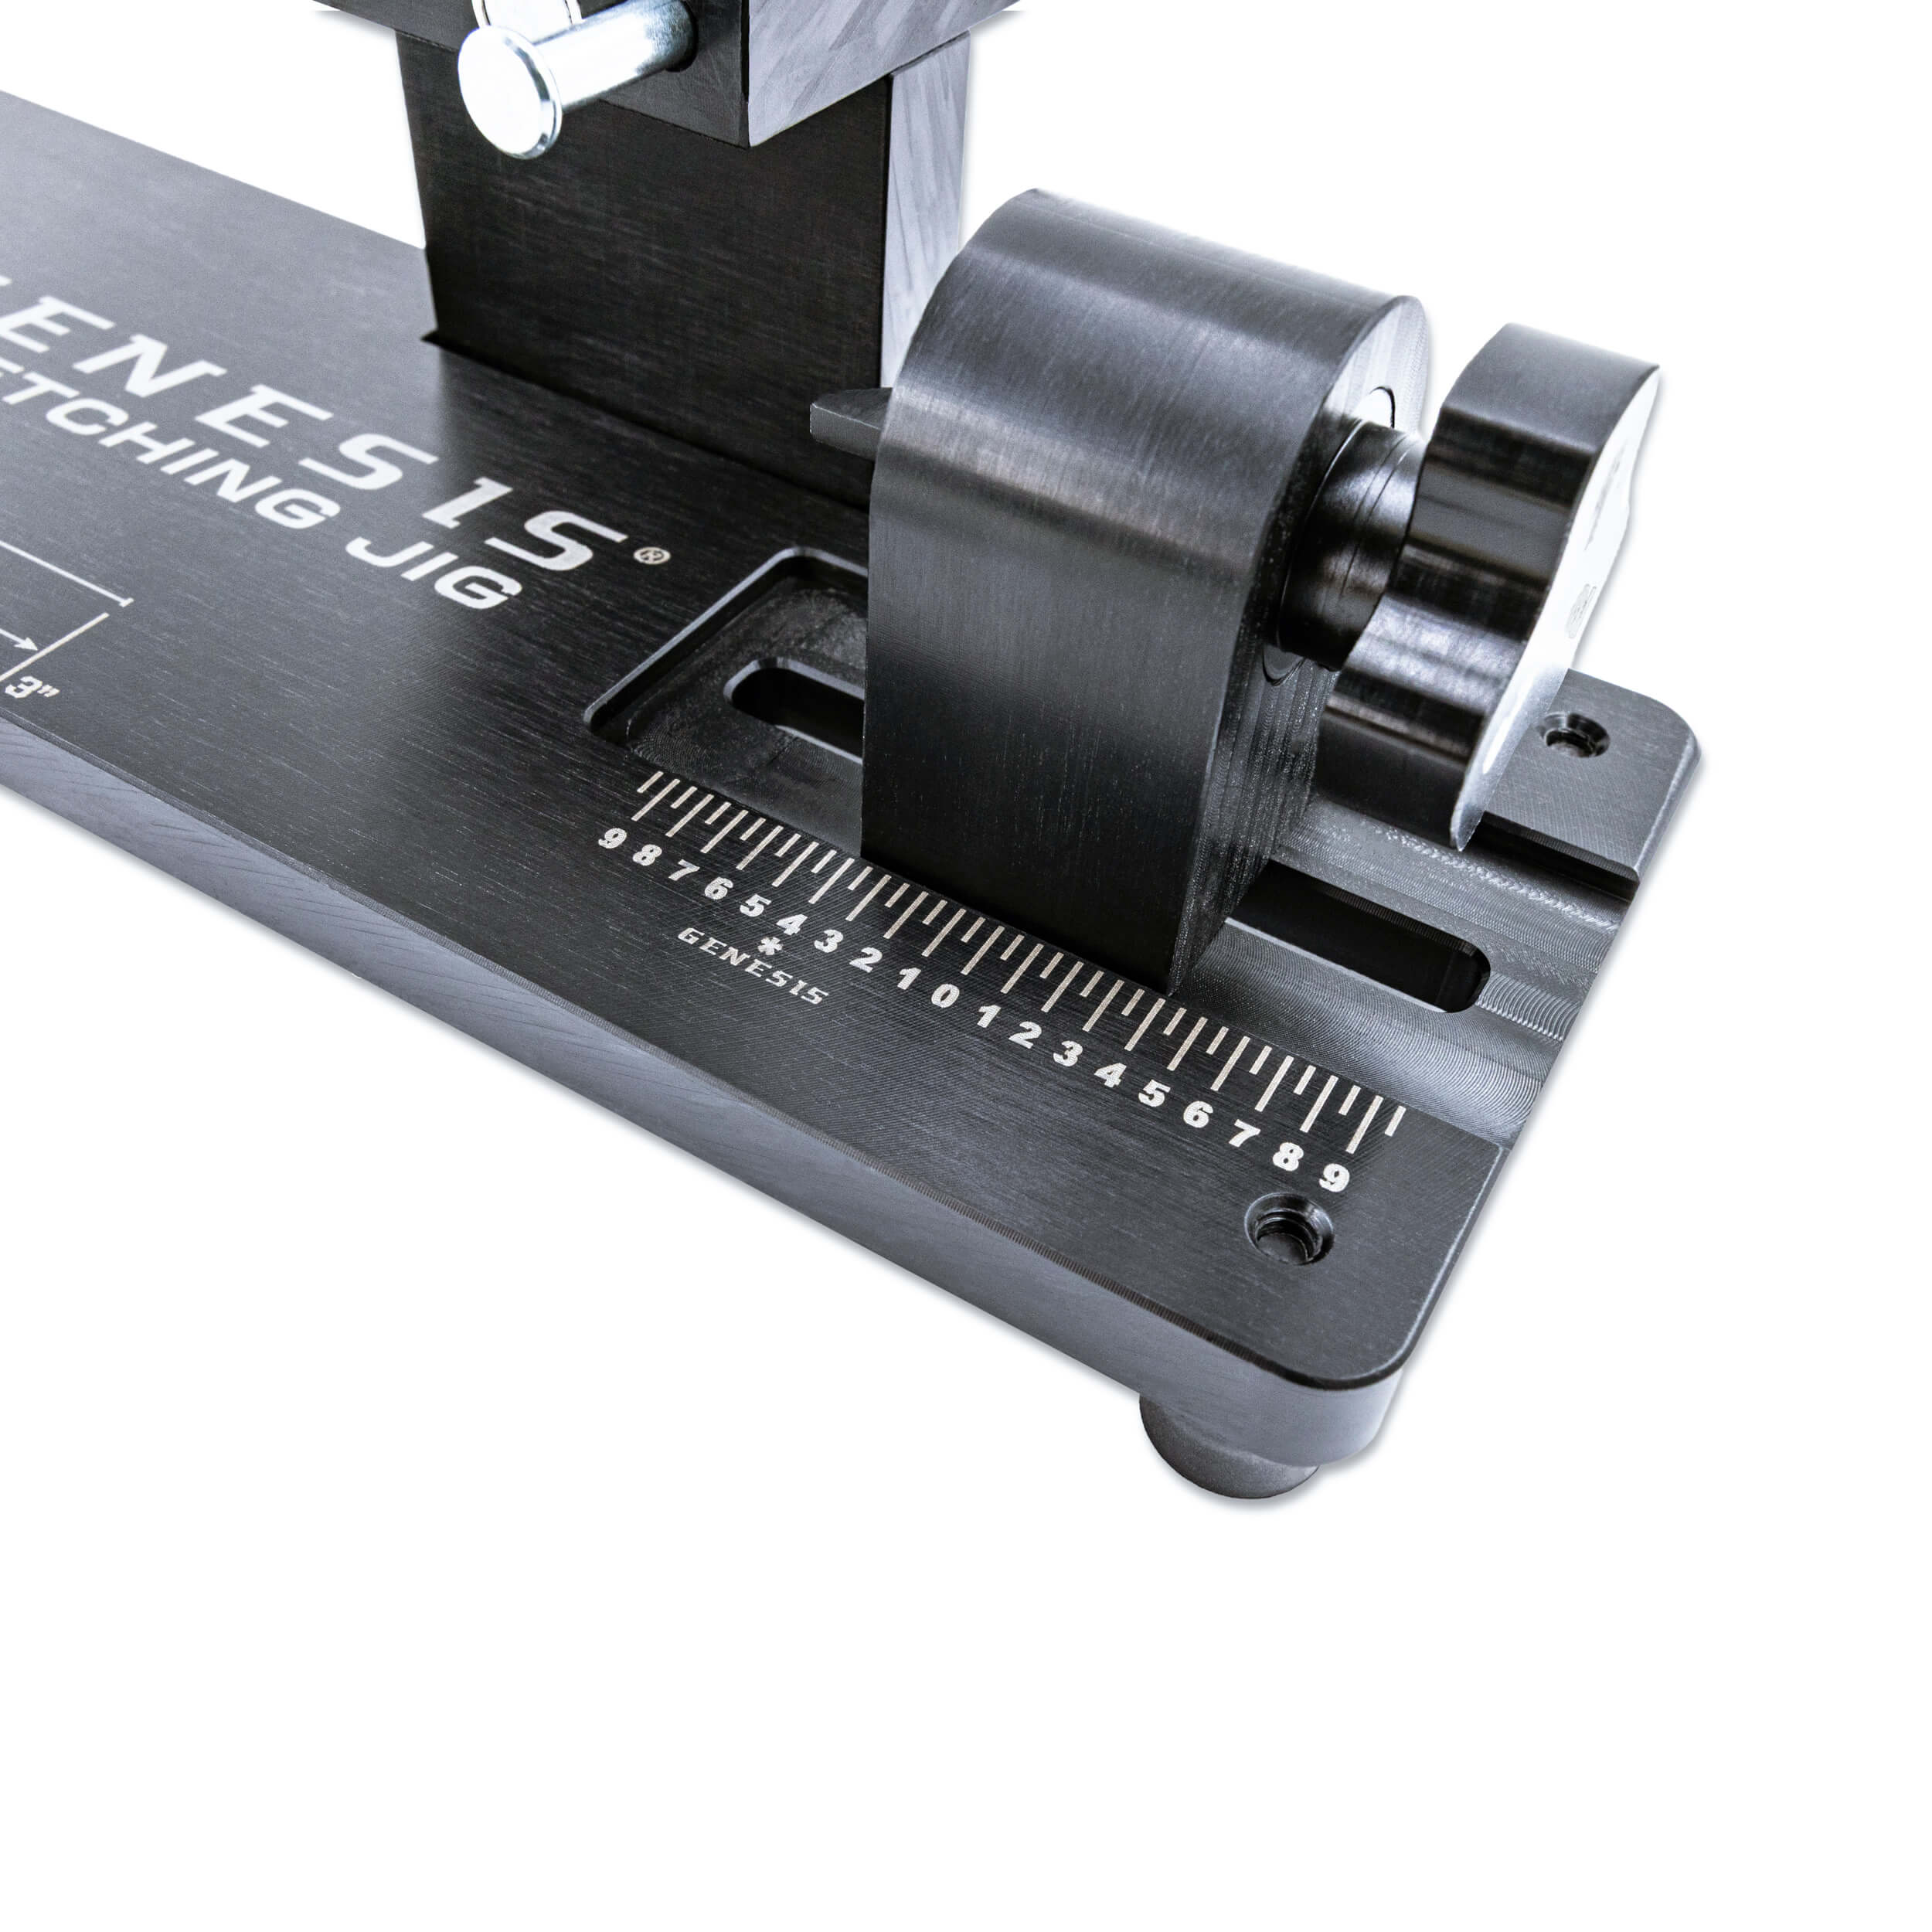
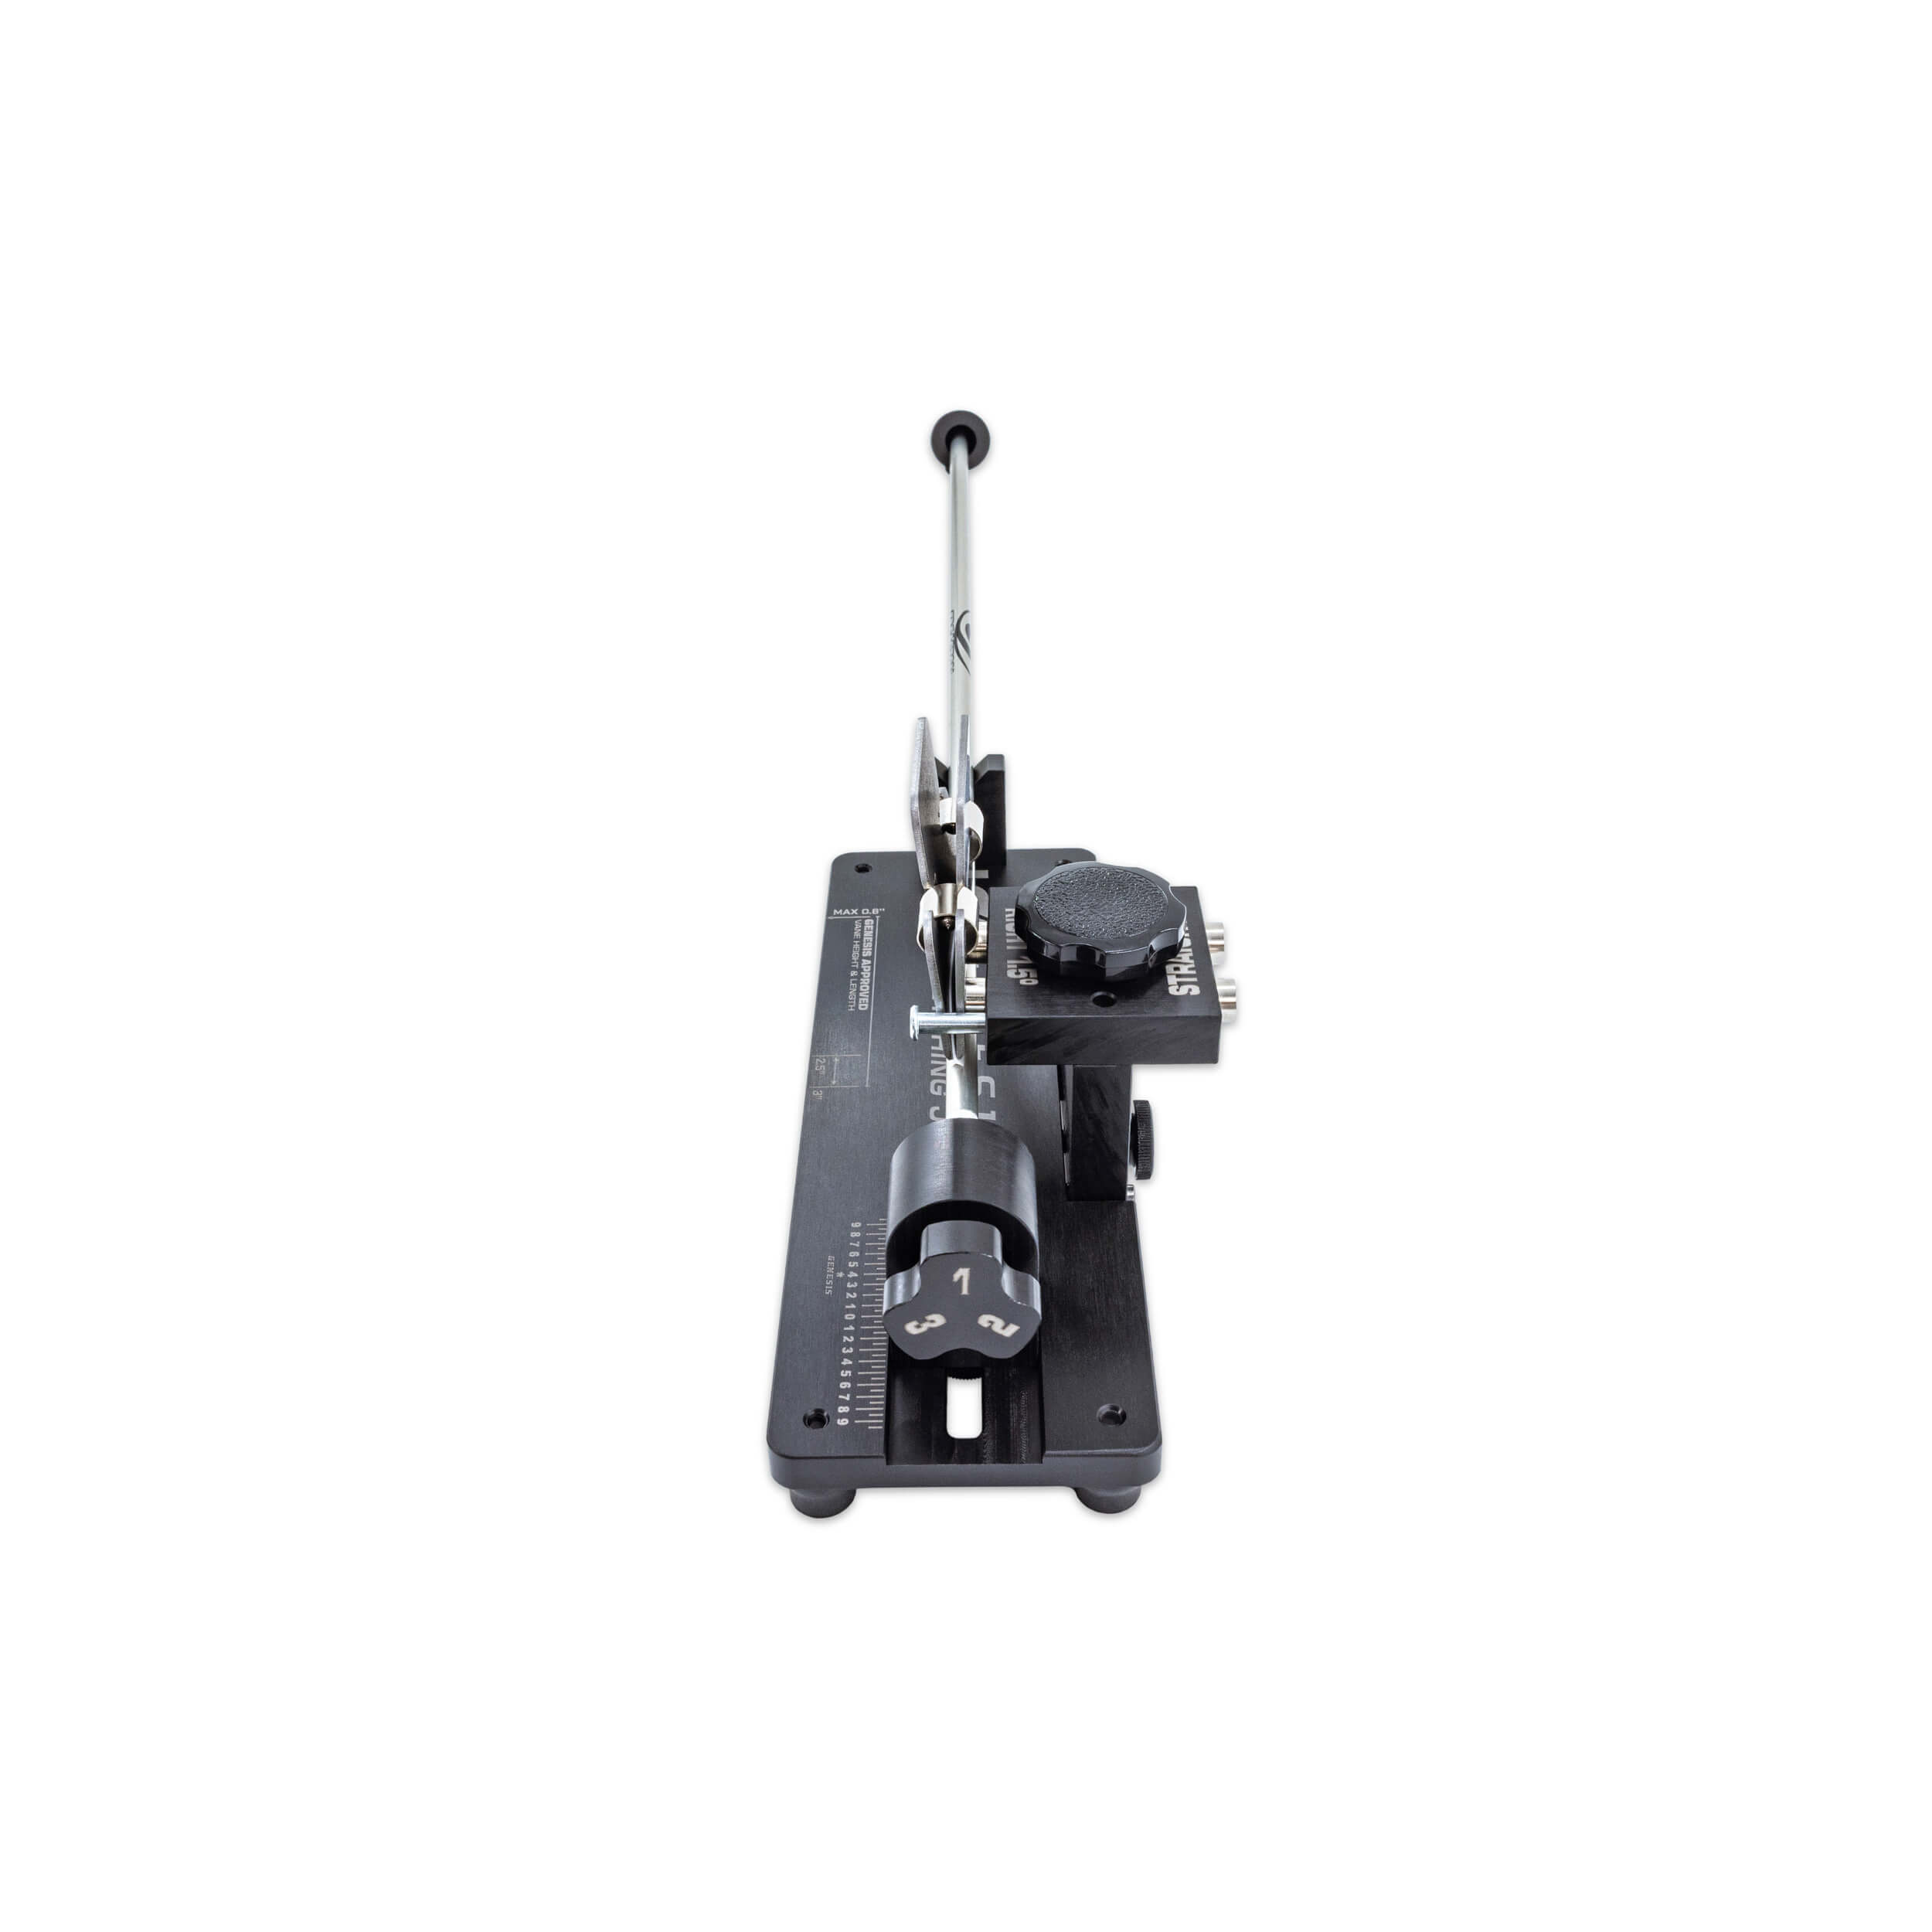
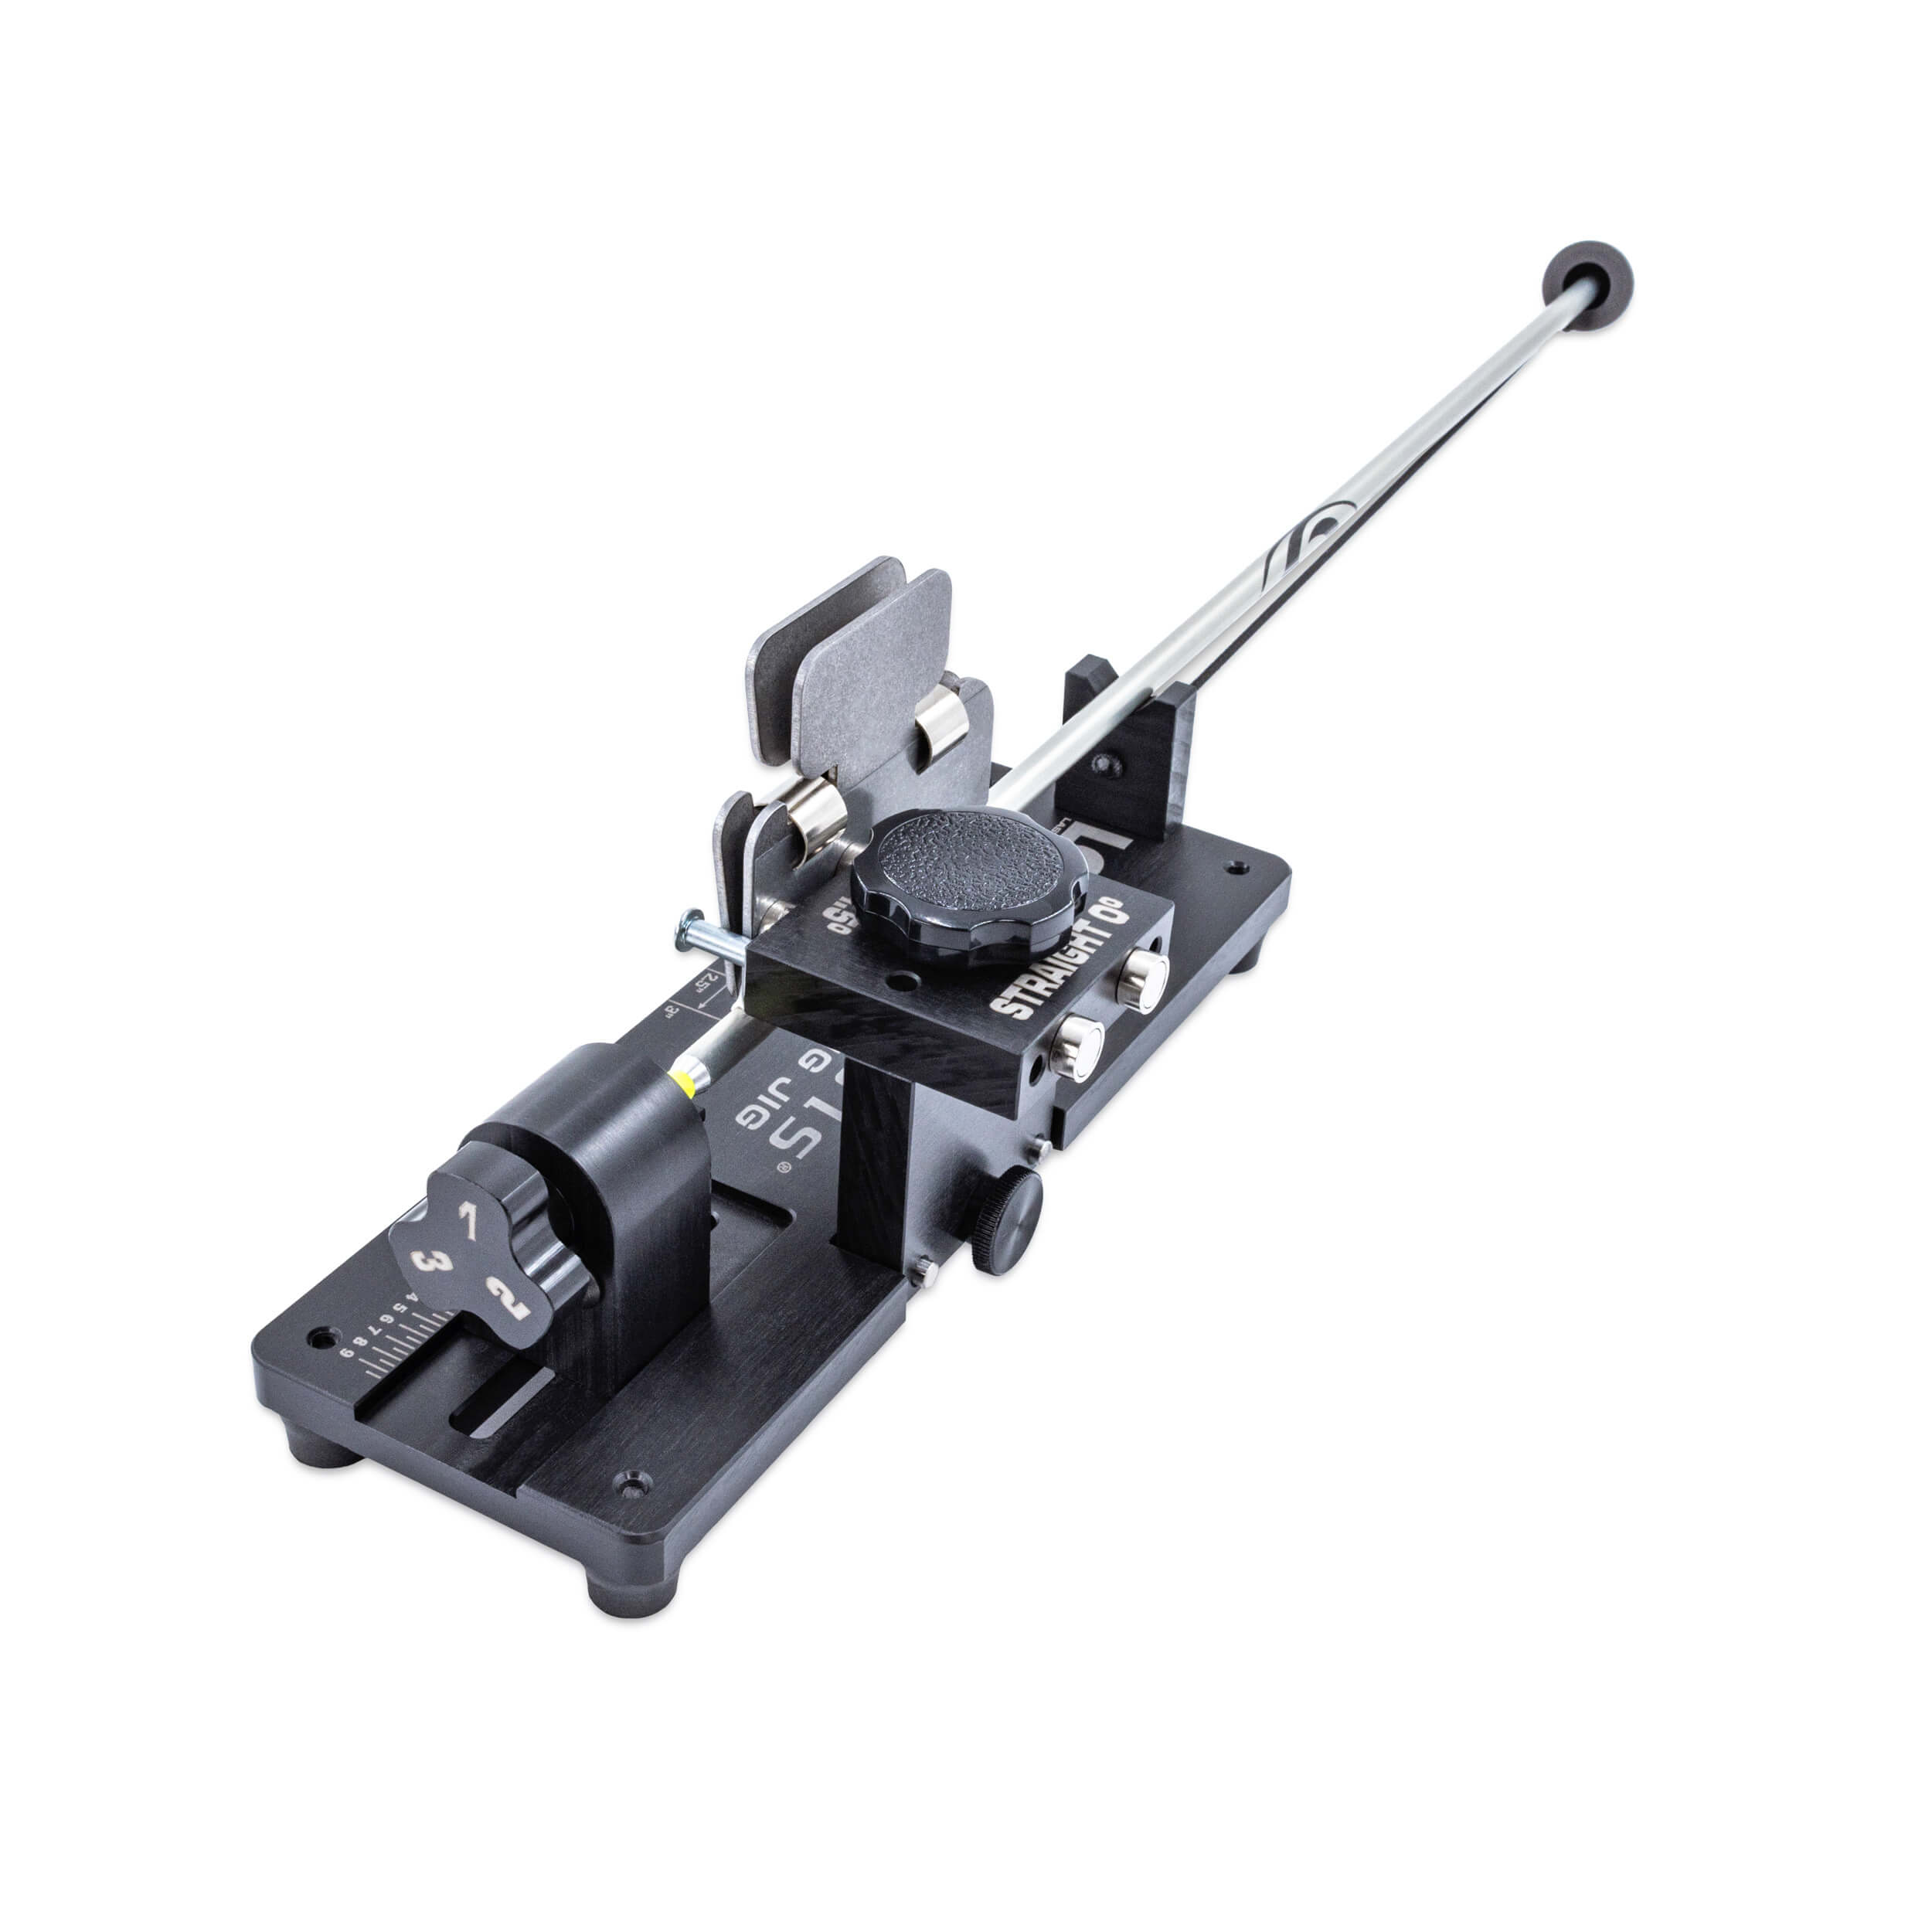
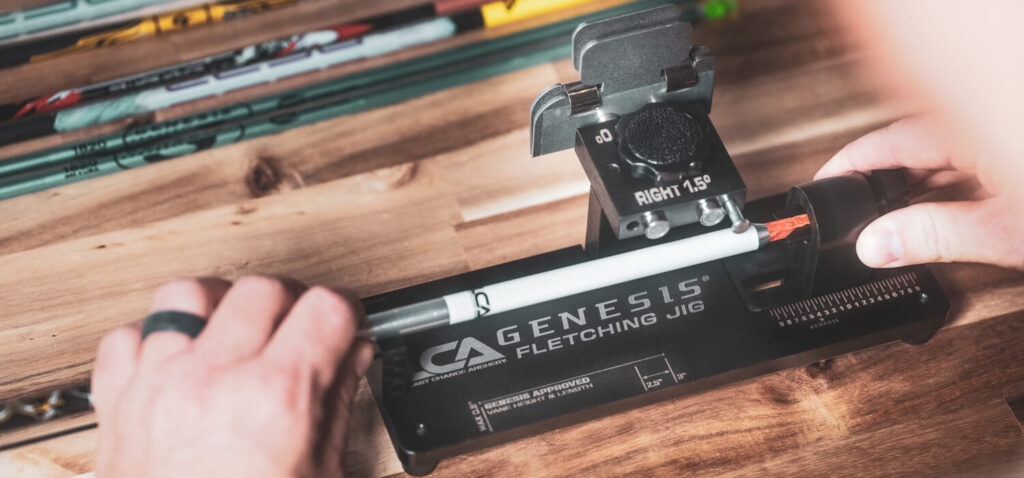
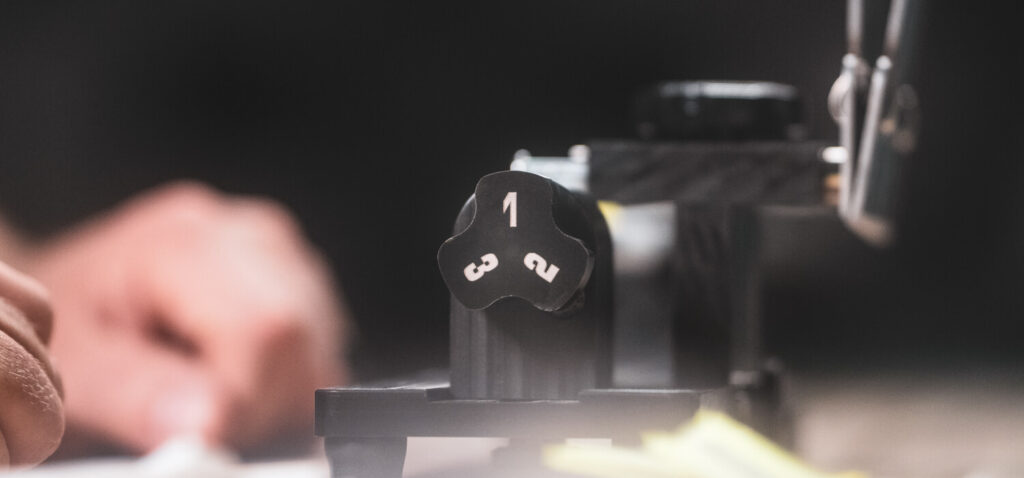
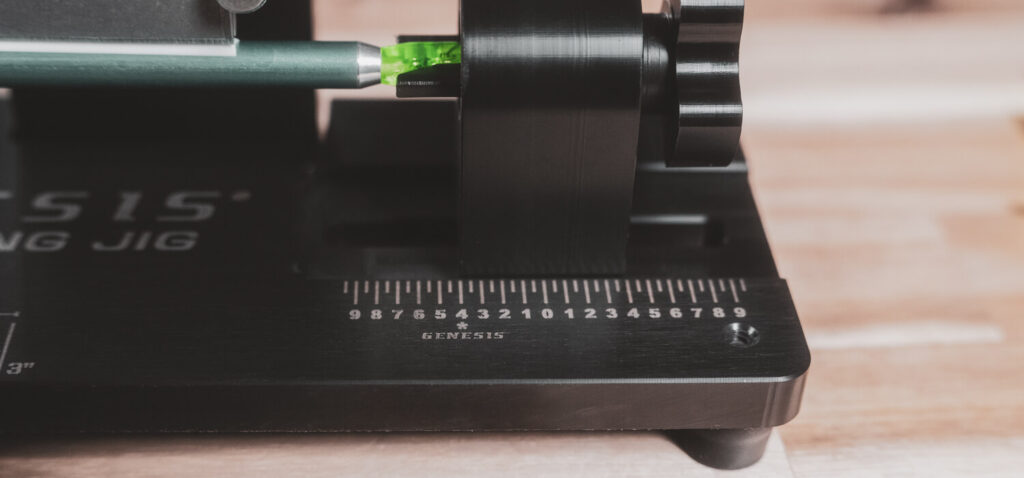
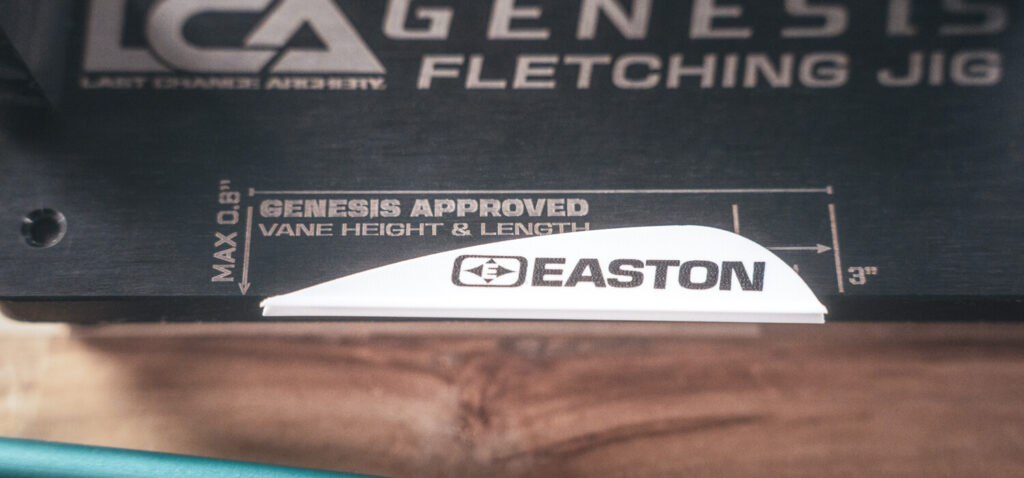
To further simplify arrow building for Genesis archers, the jig also incorporates reference markings aligned with official Genesis 1820 arrow build guidelines. These markings help verify proper vane height and a maximum vane length of 3 inches without guesswork. Laser-etched scale marks guide vane placement exactly 1 inch from the nock throat and include a dedicated receiver alignment mark for proper Genesis 1820 arrow setup. The indexed nock receiver is labeled 1, 2, and 3 to simplify true 3-fletch rotation—ideal for Genesis 1820 builds that use a single-color vane in position 1 and matching vanes in positions 2 and 3.
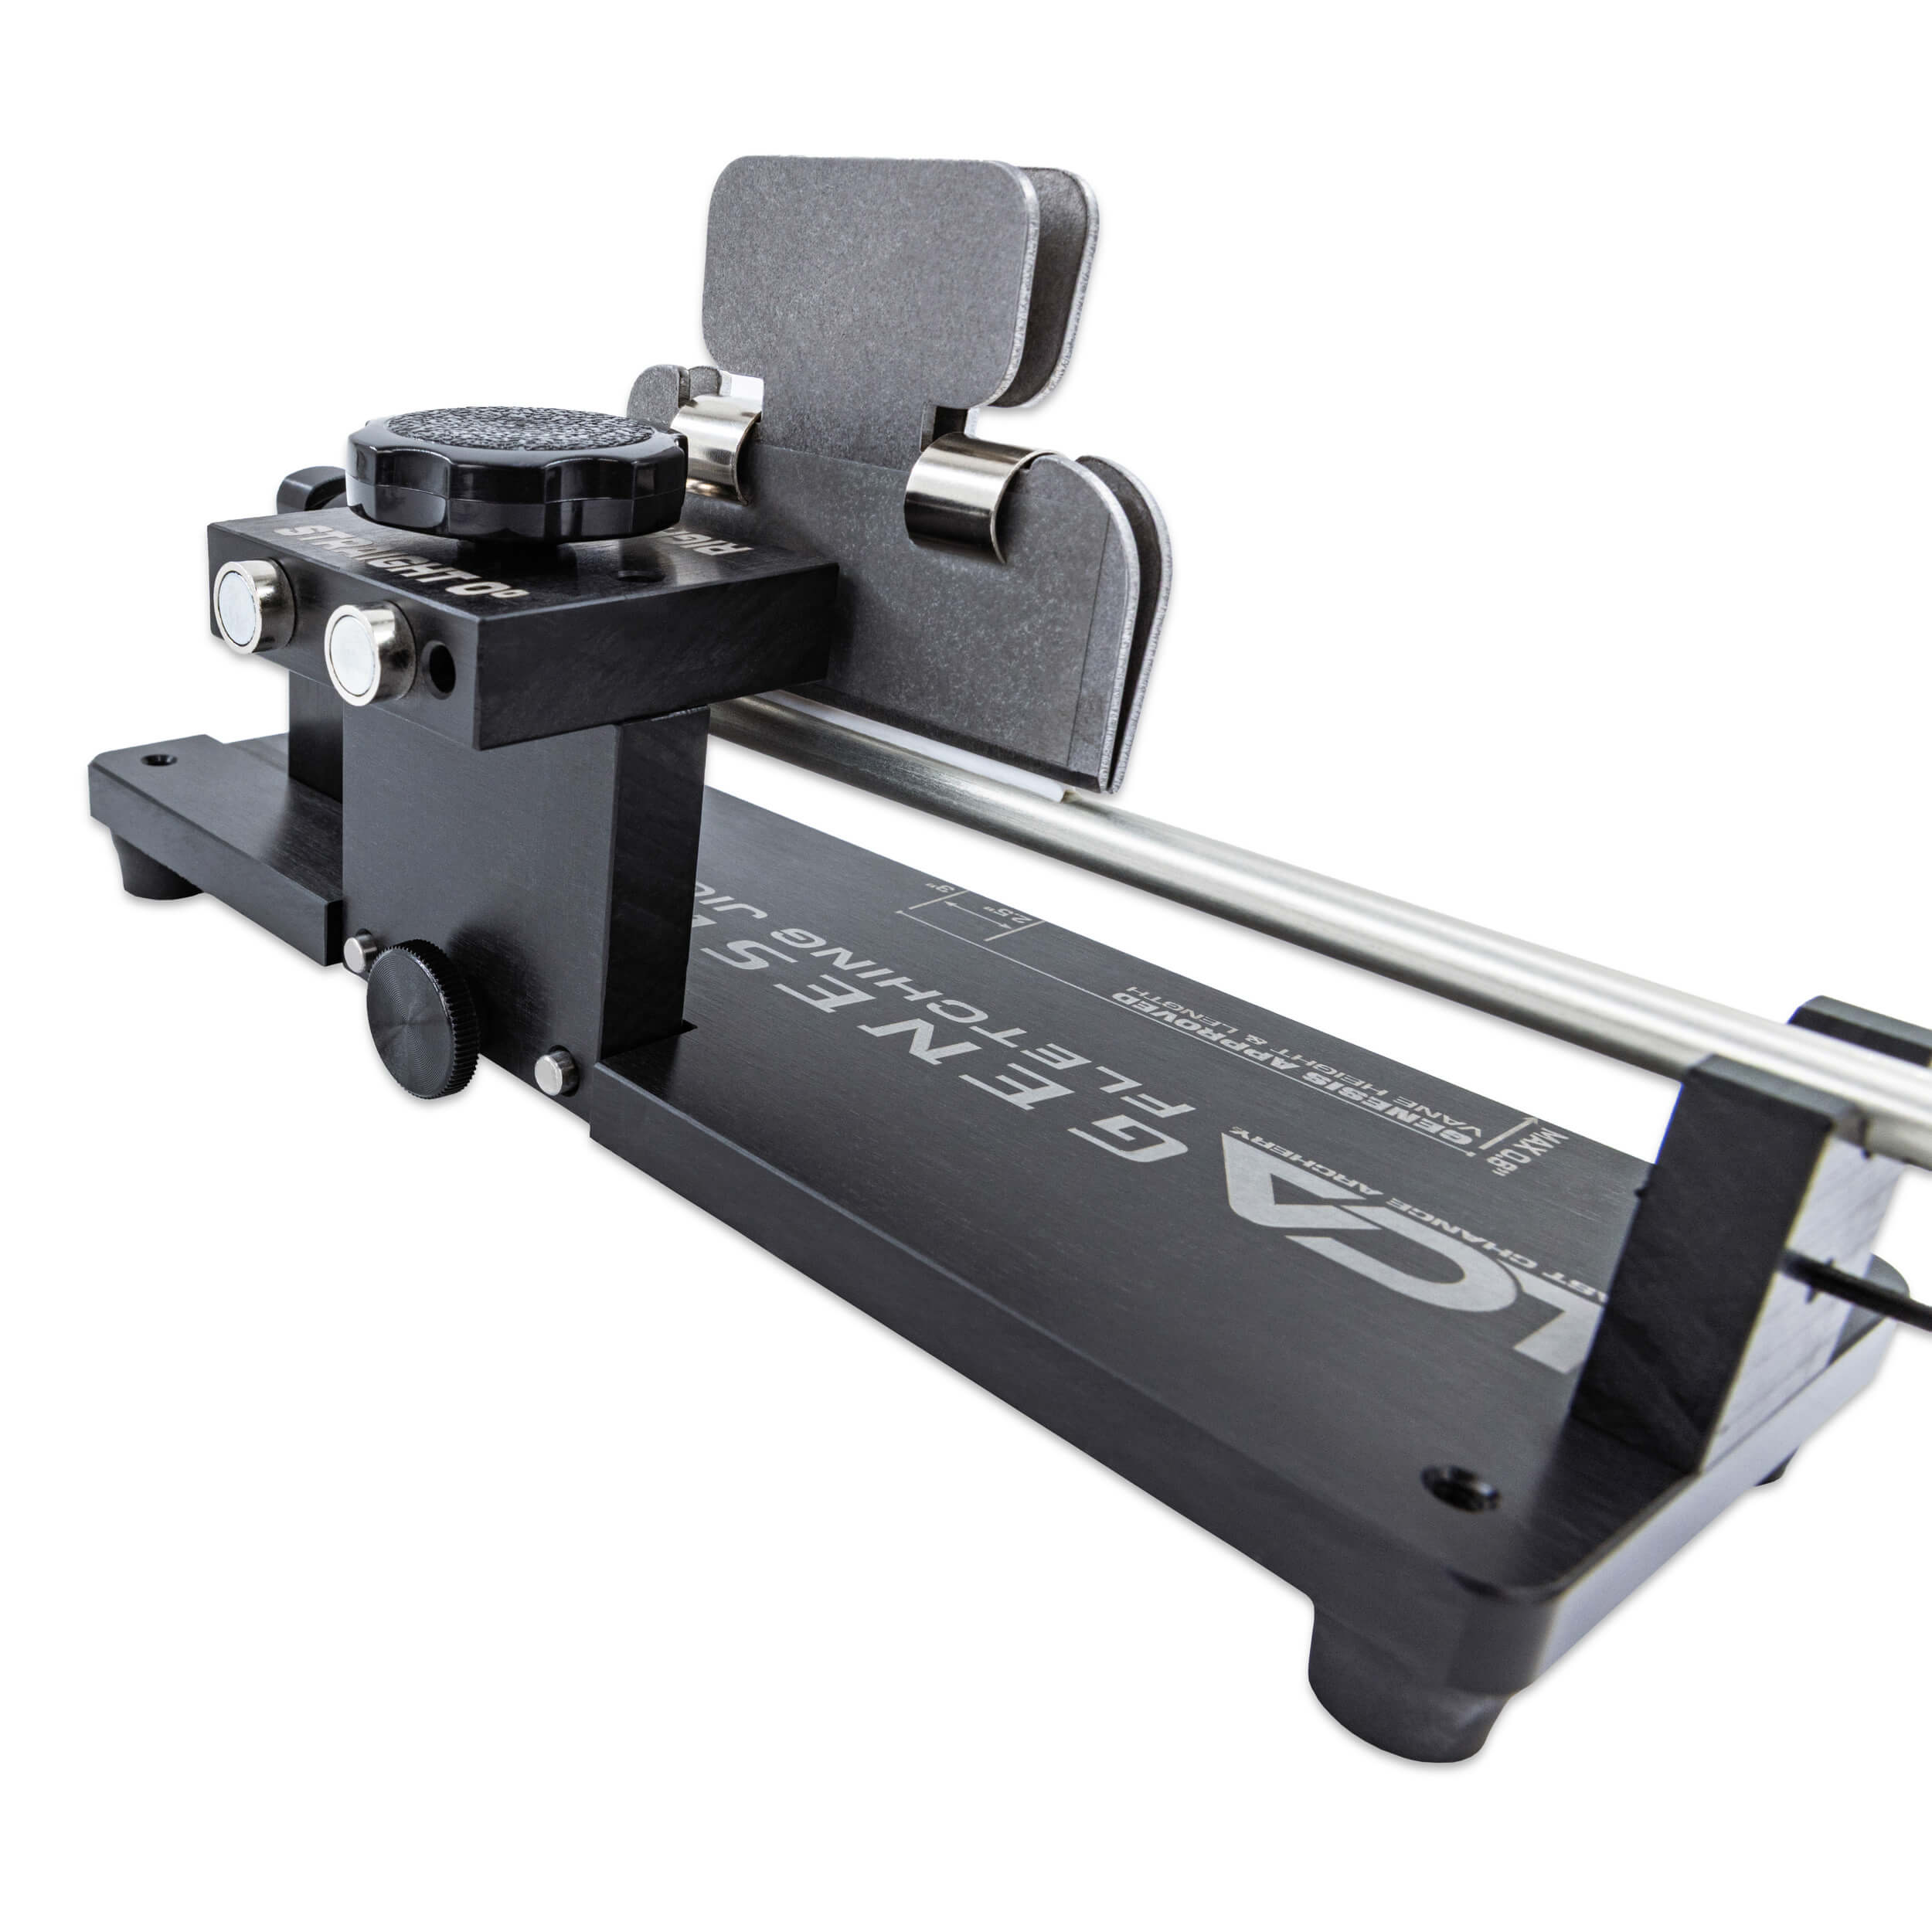
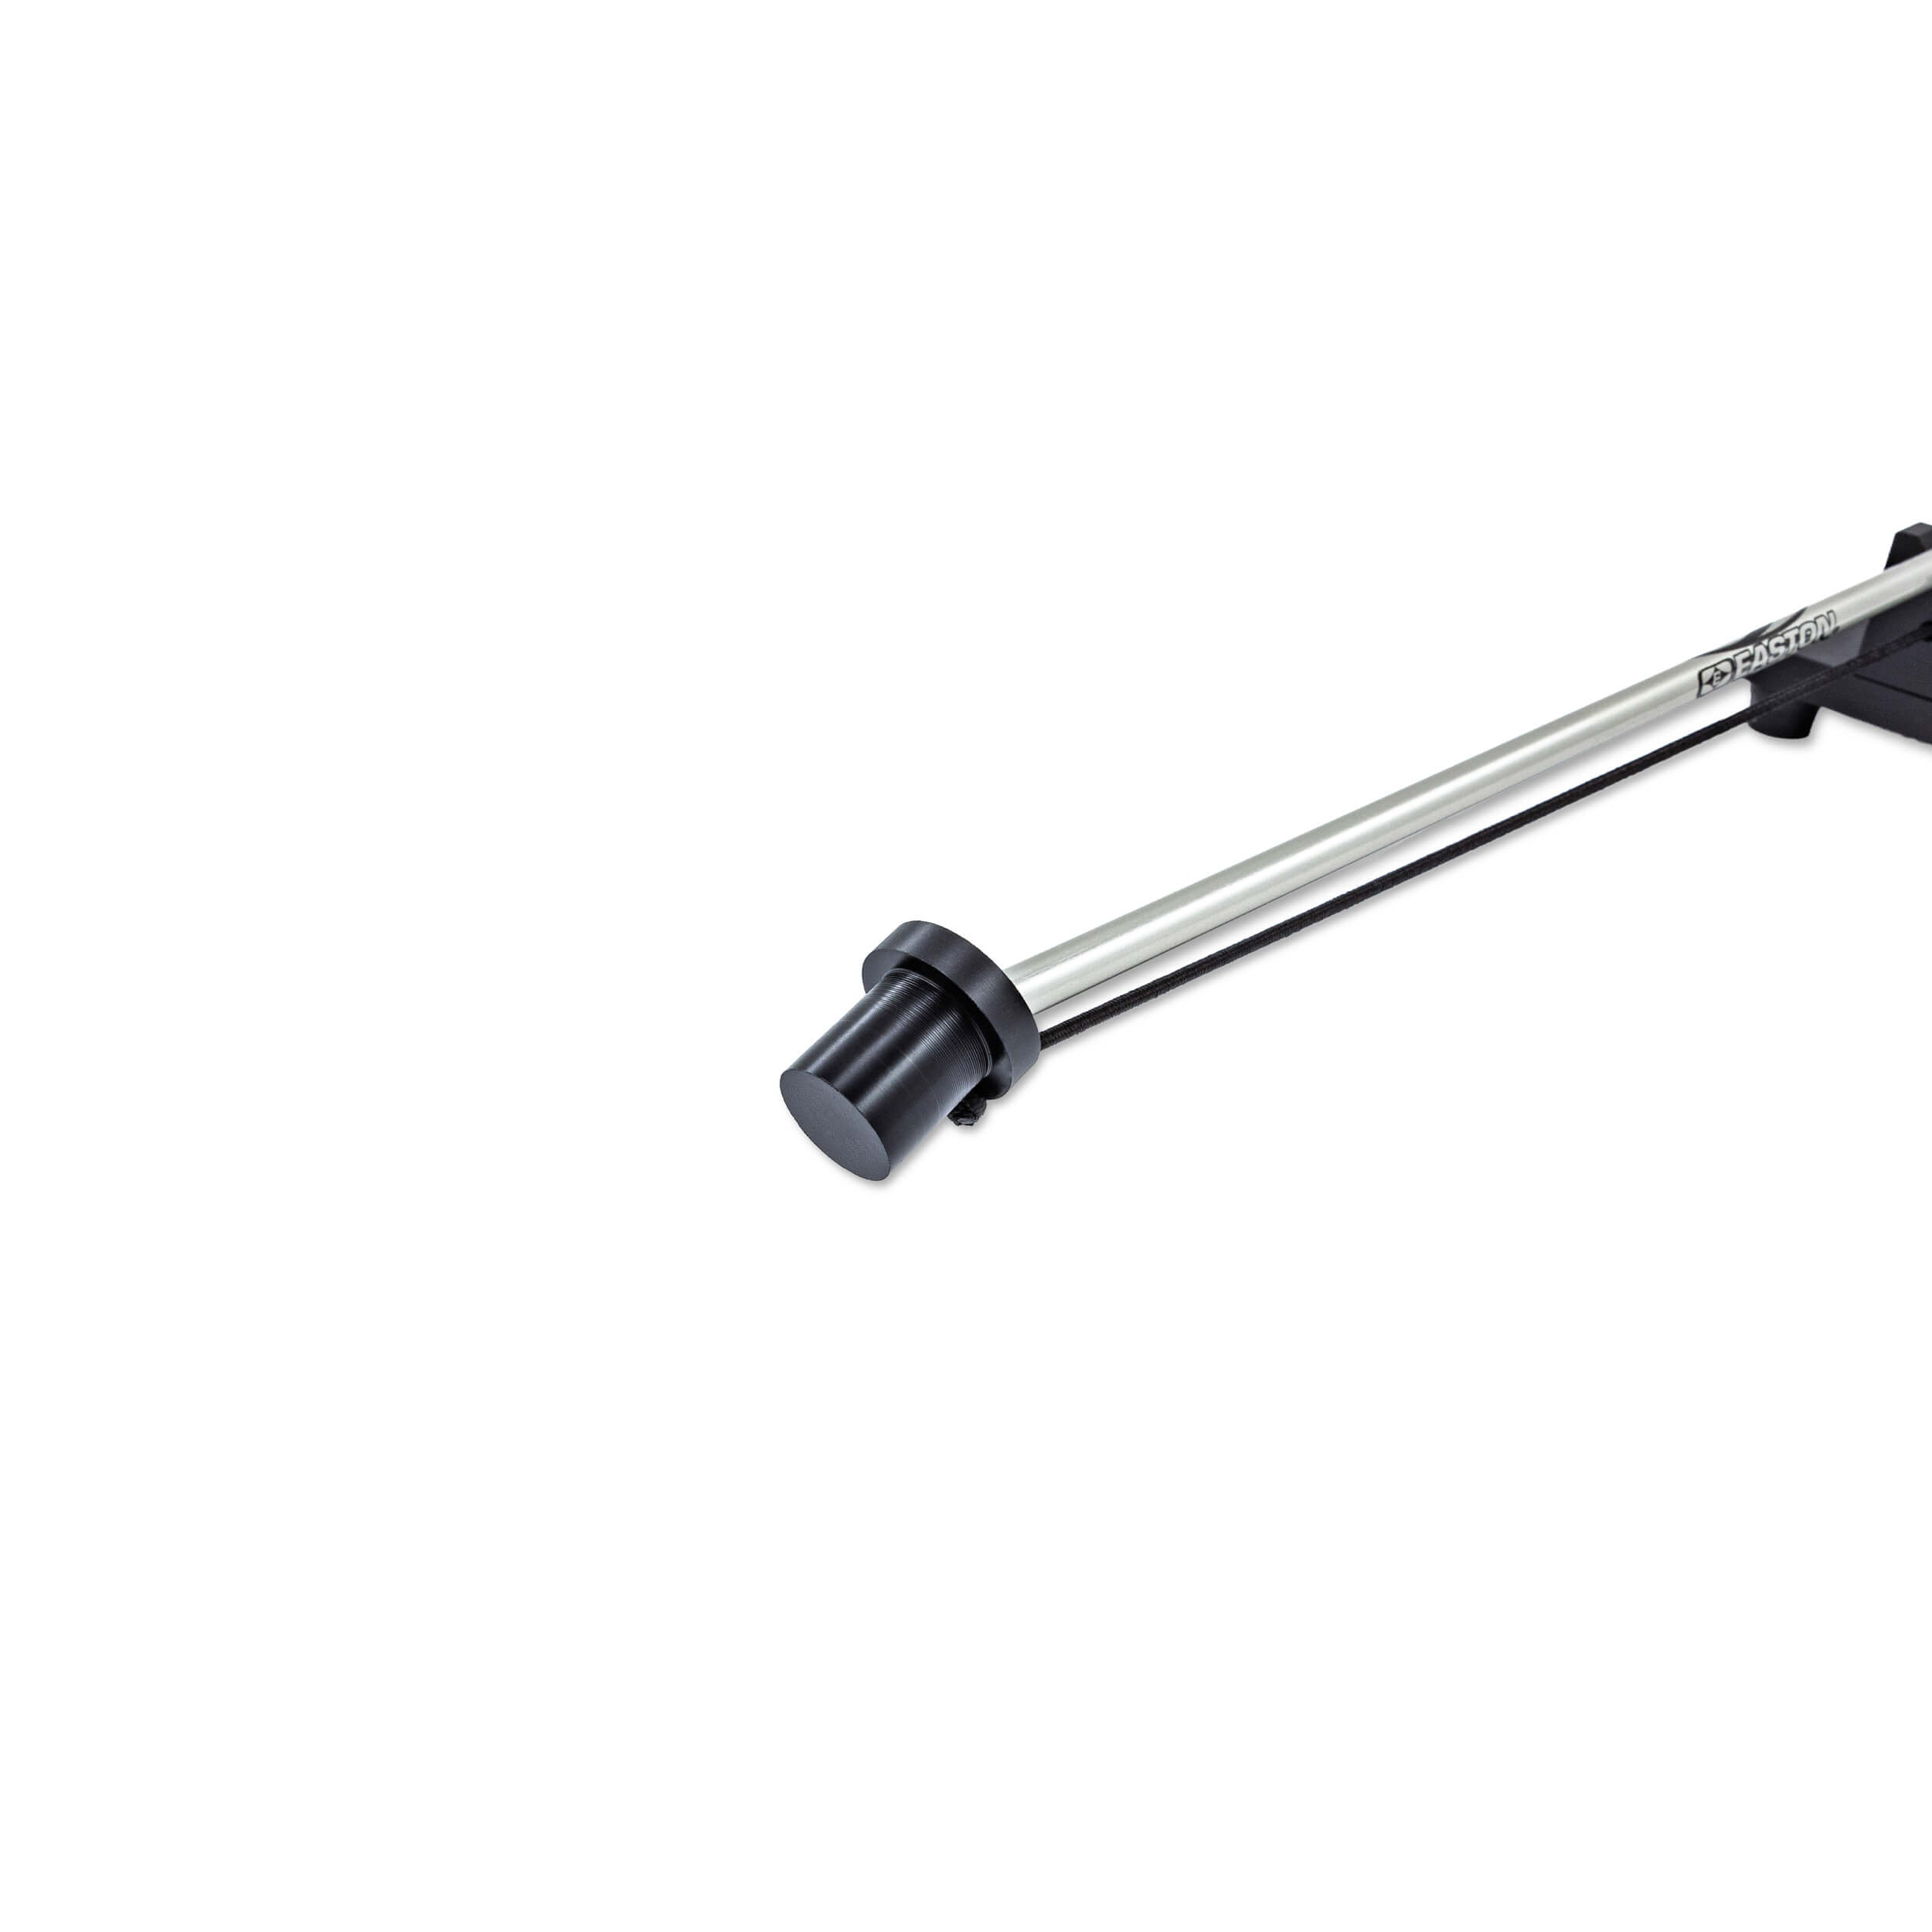
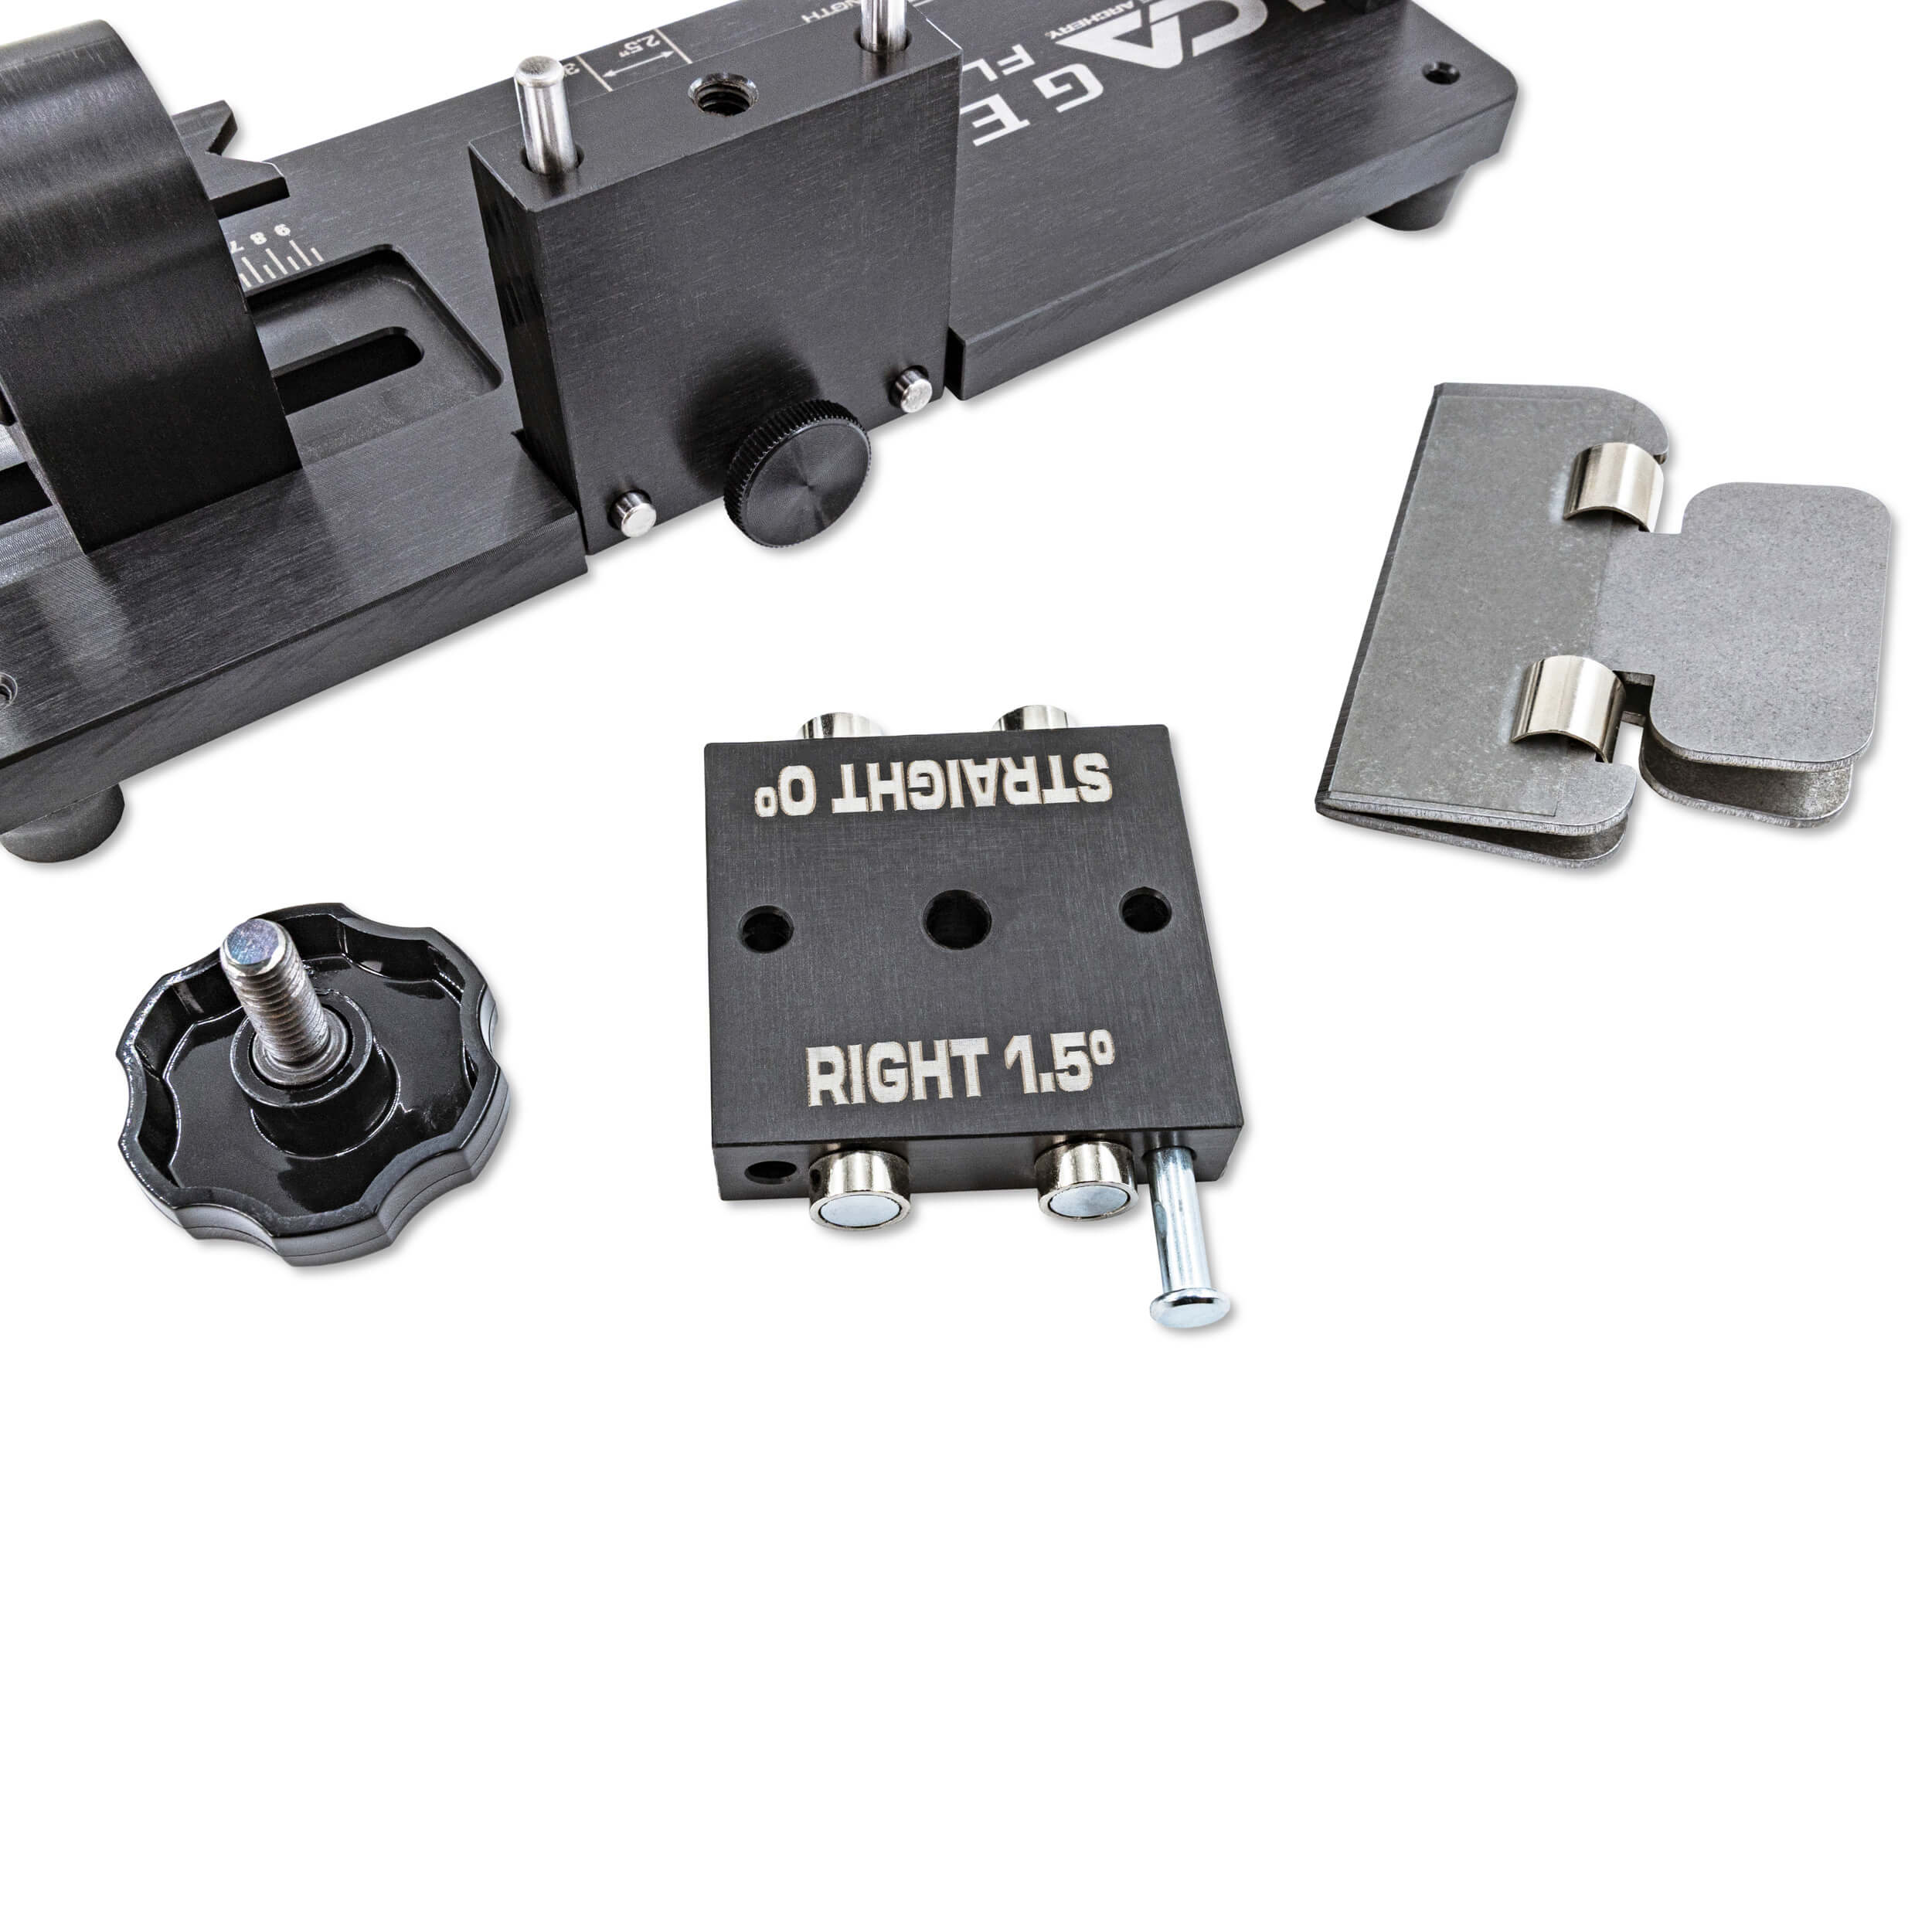
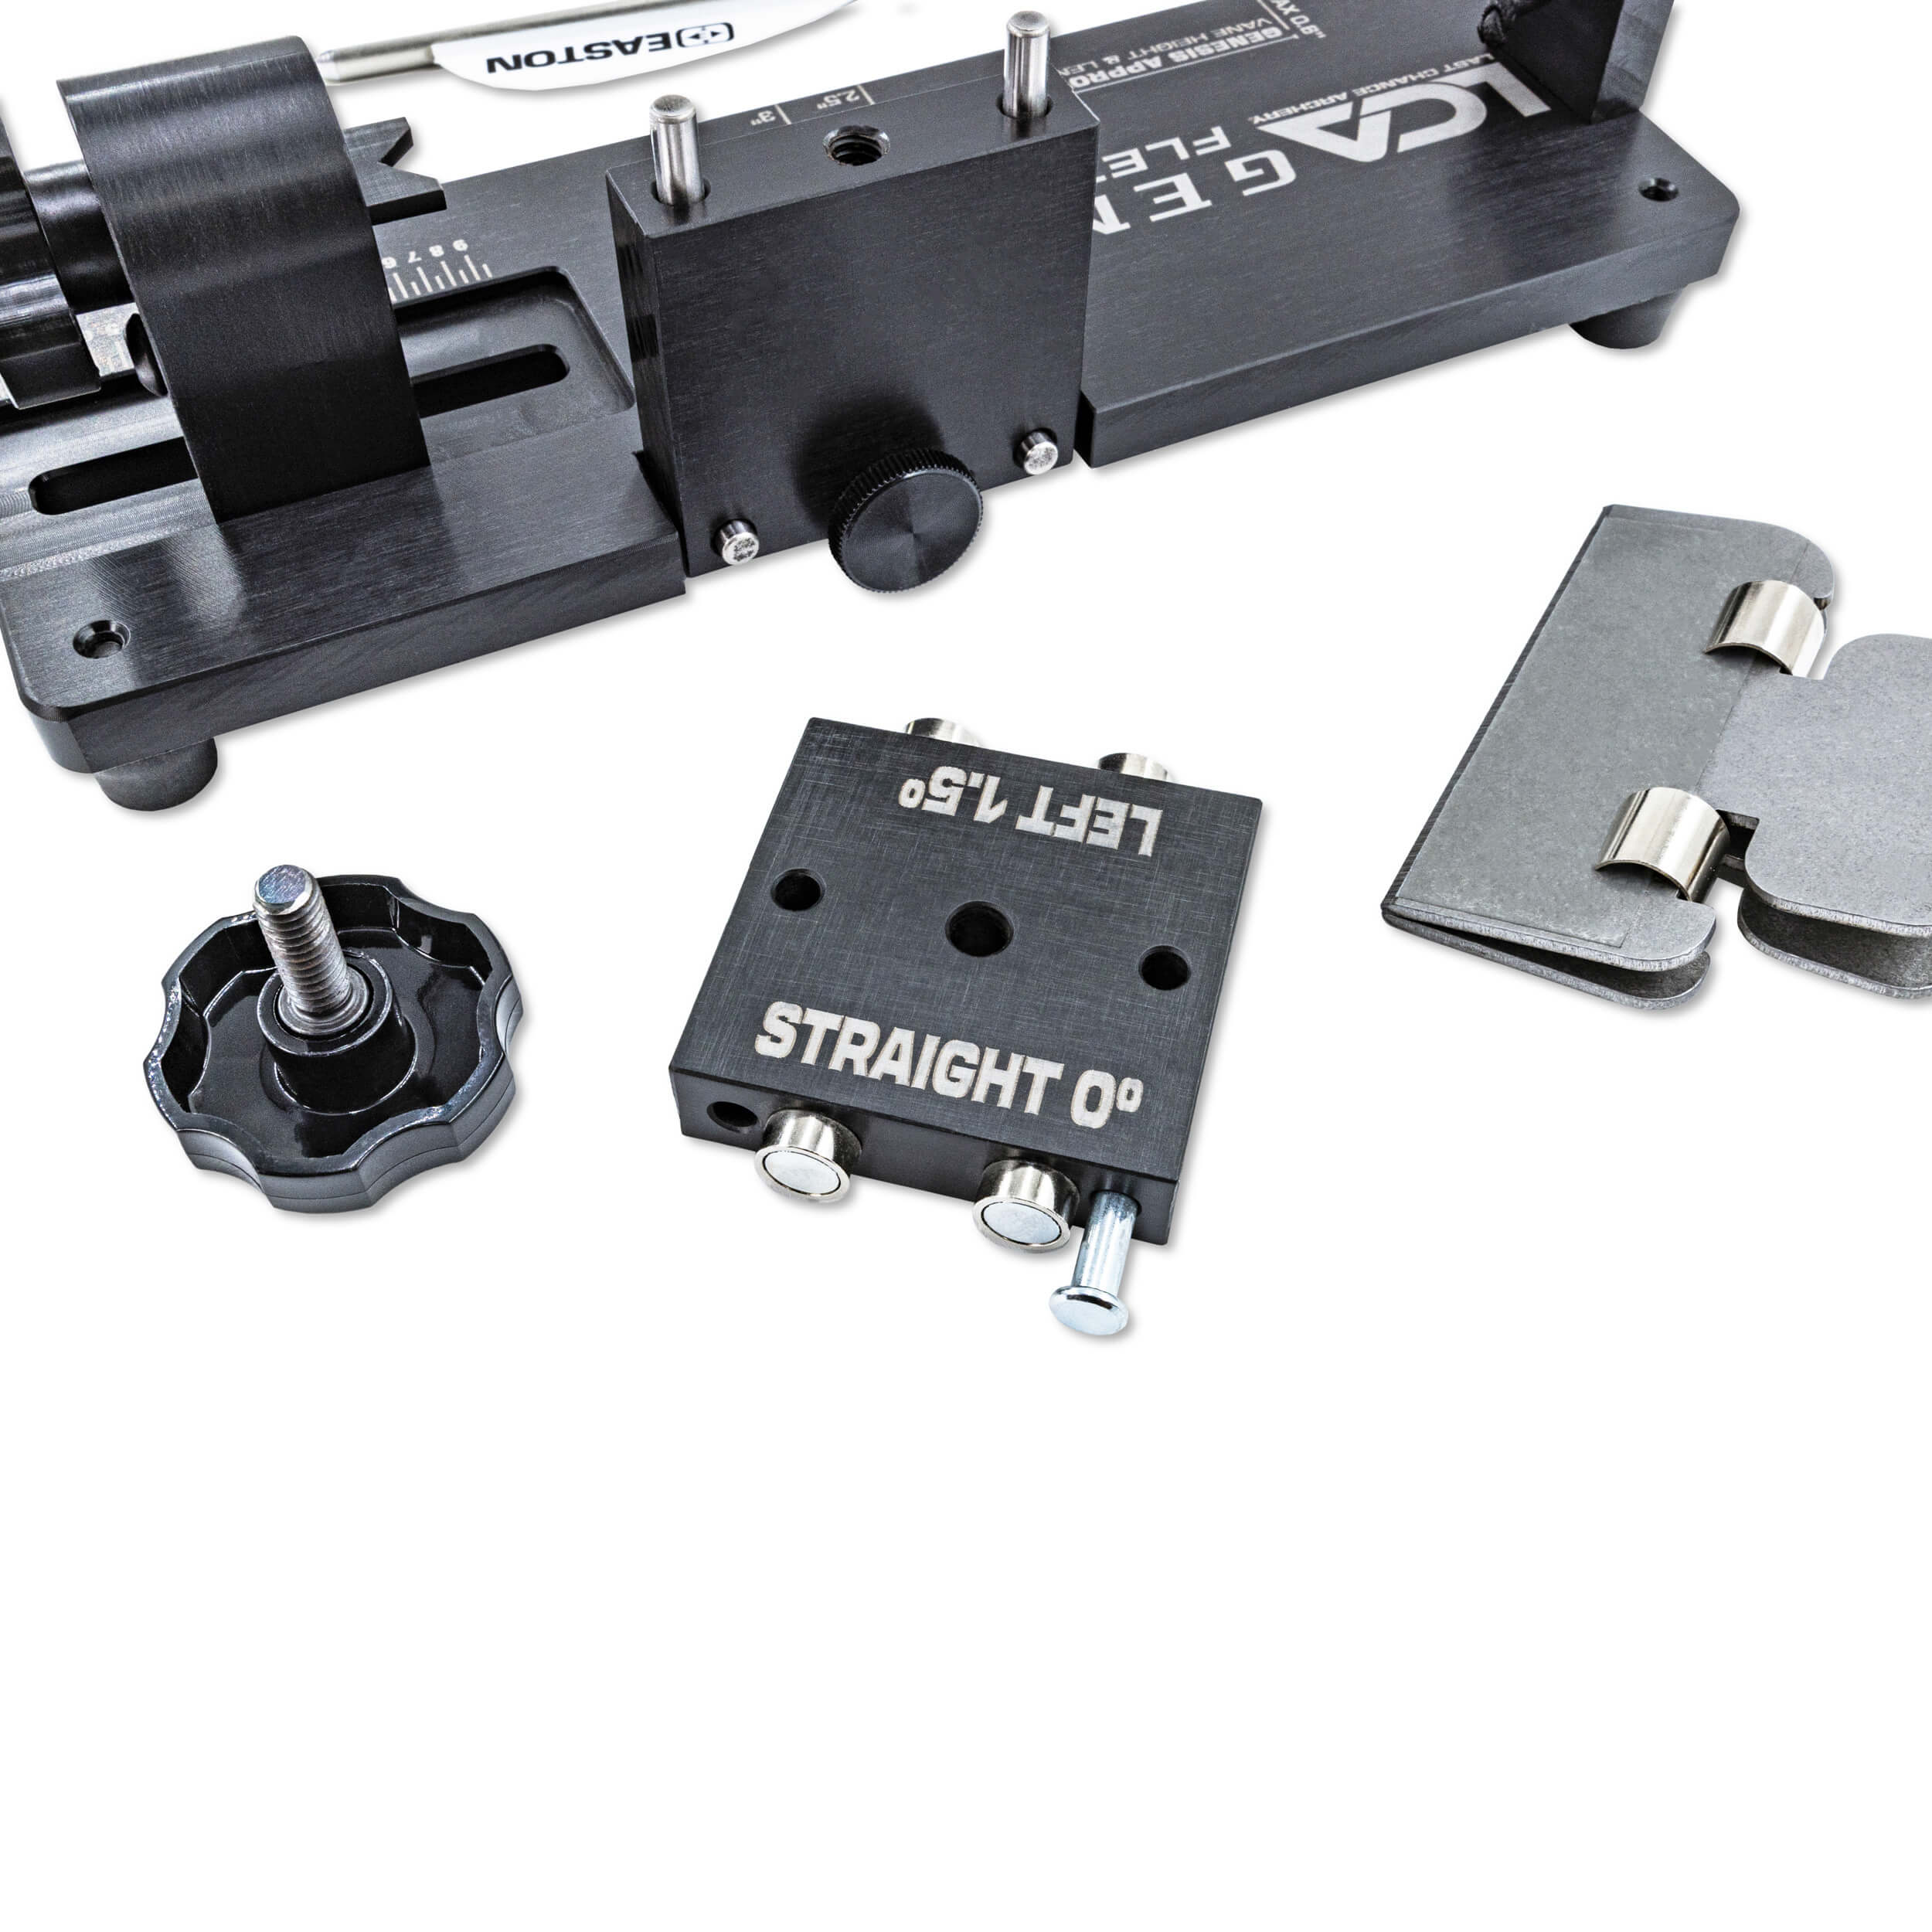
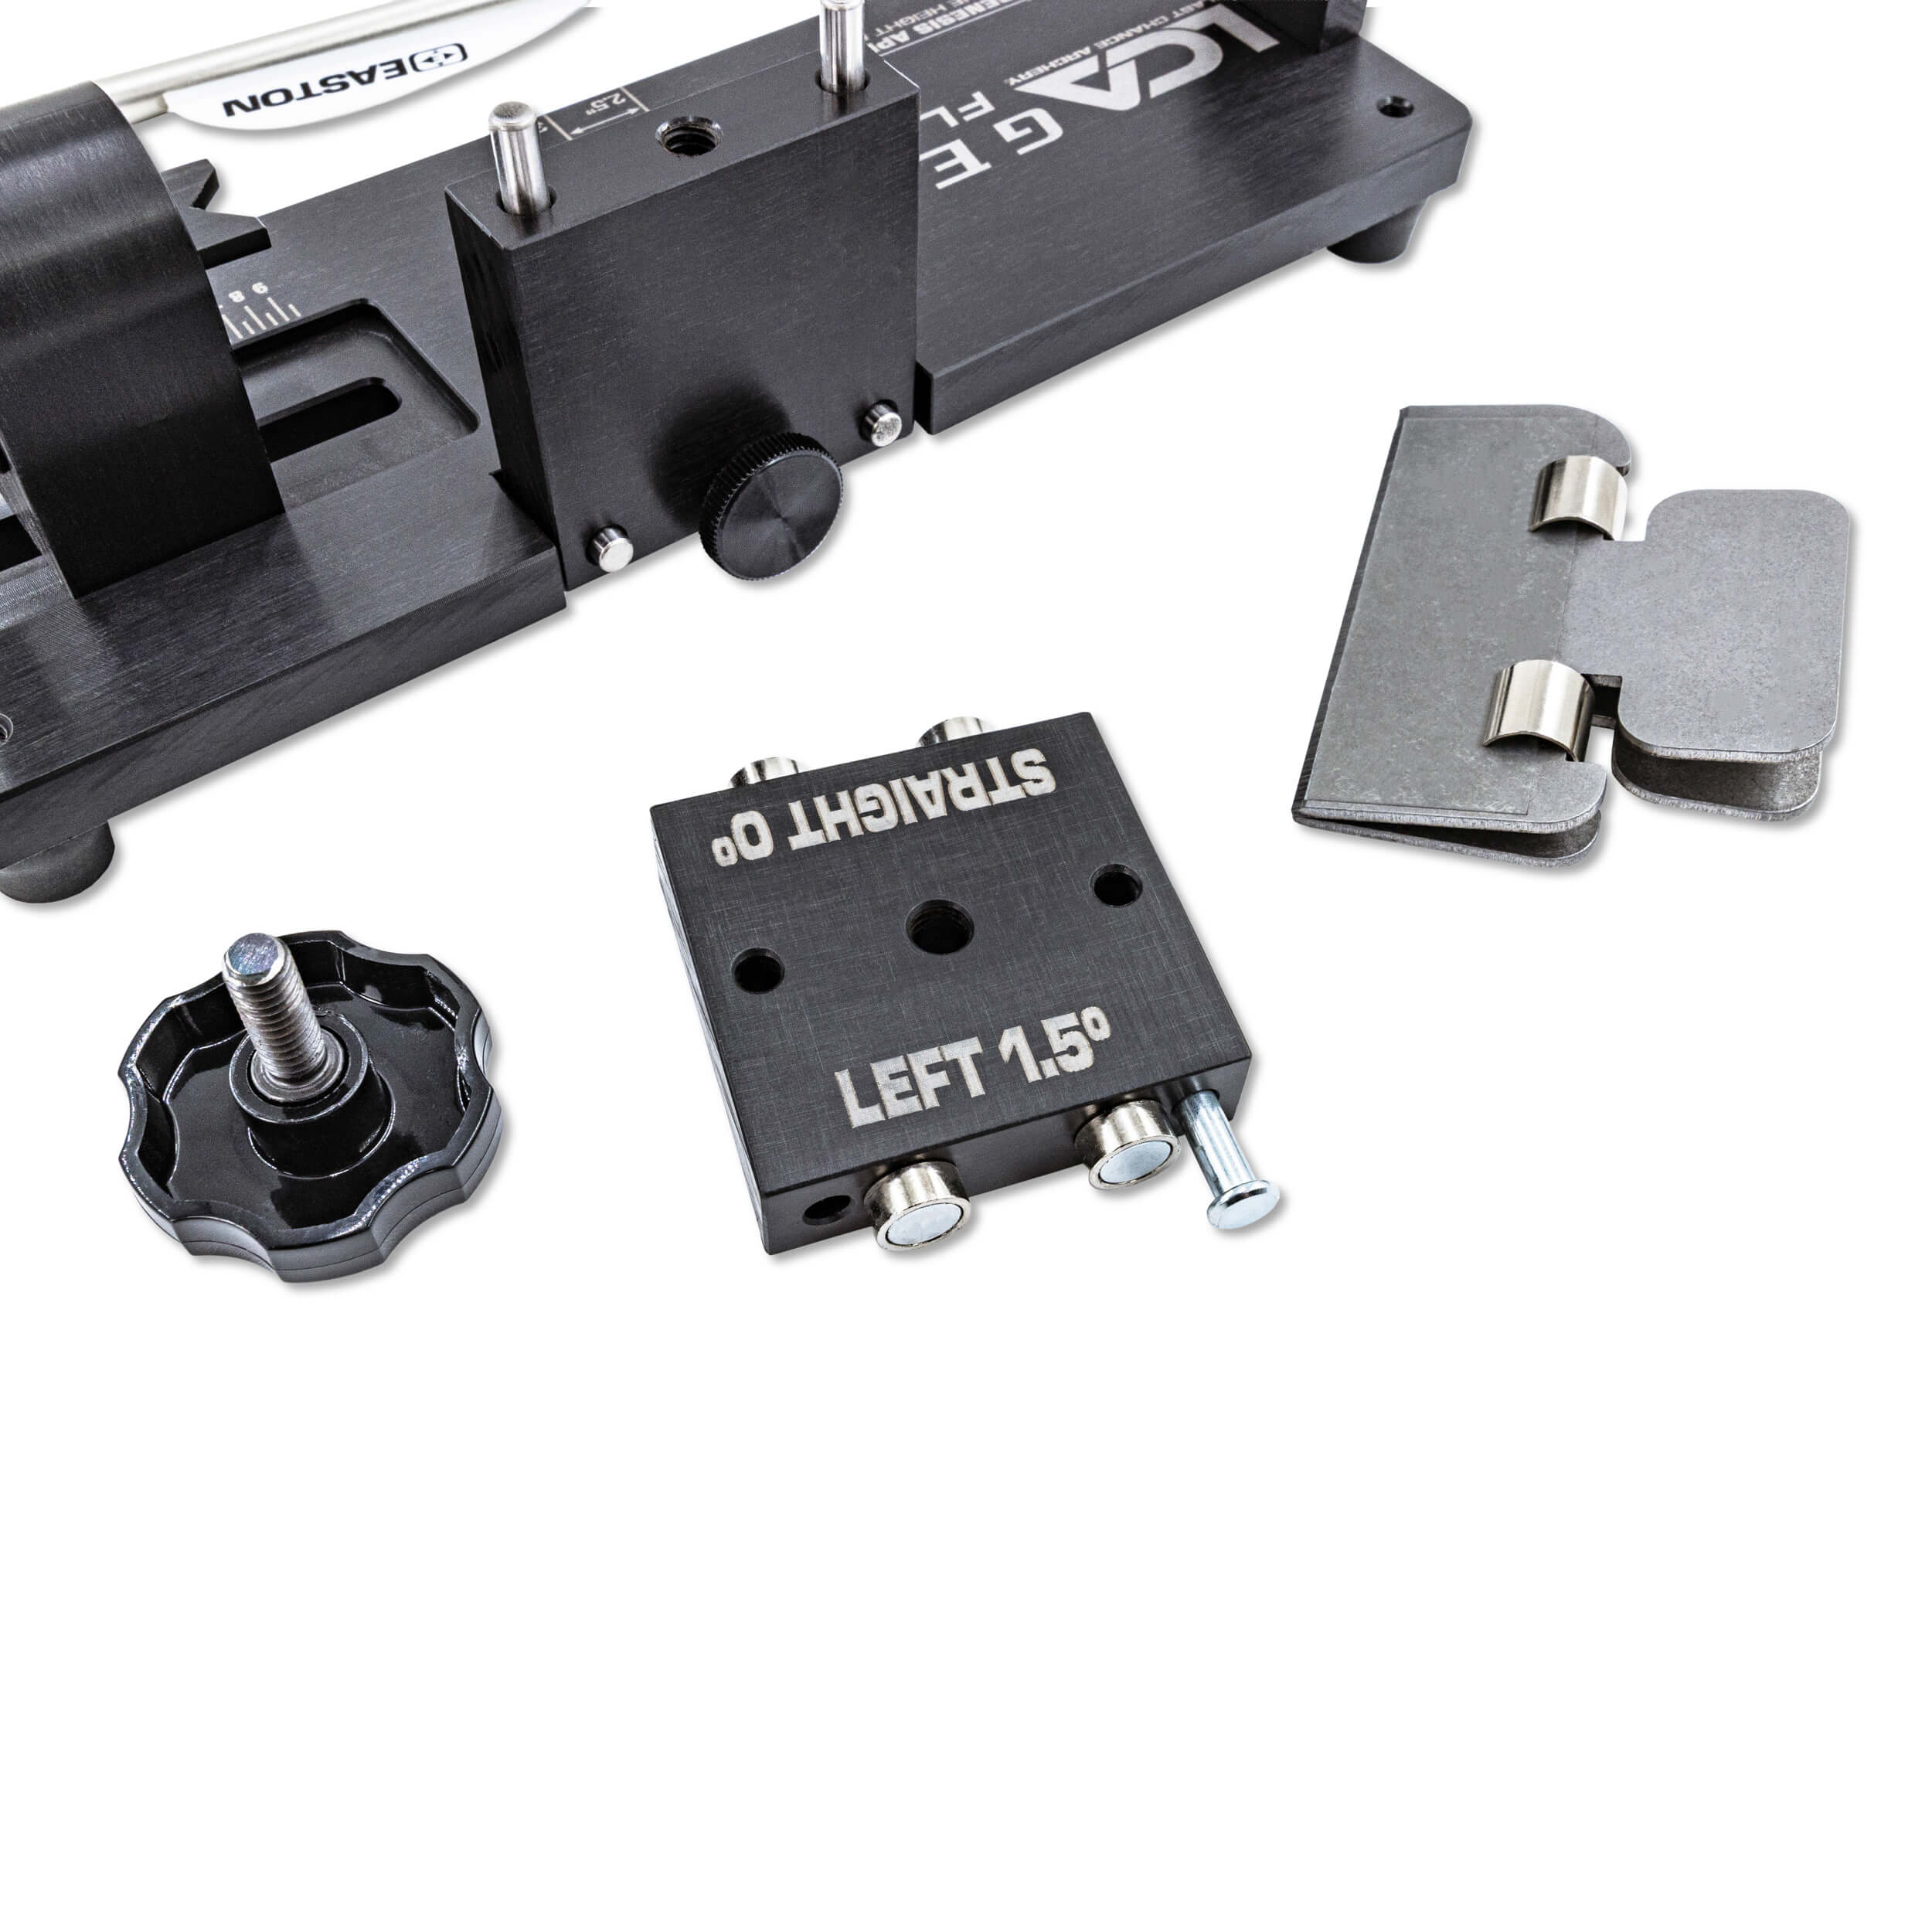
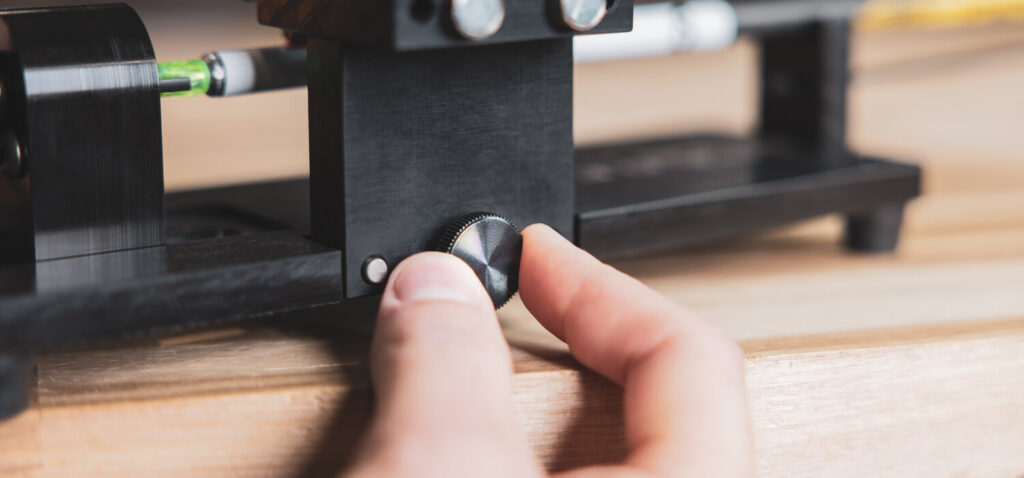
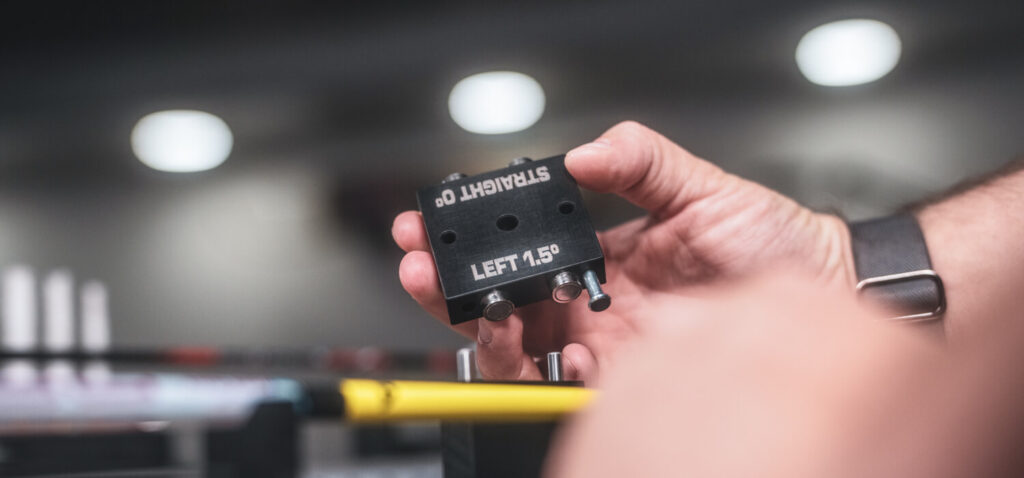
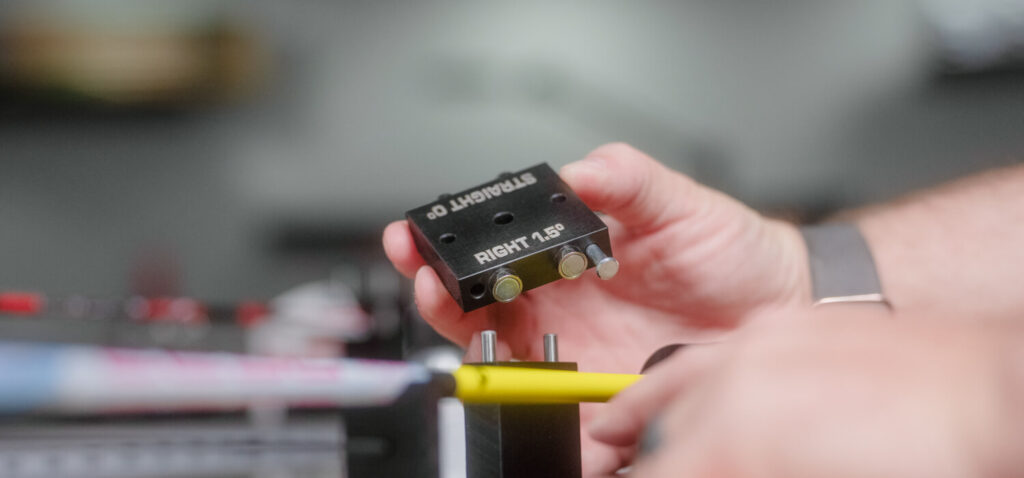
The jig applies a precise 1.5° left or right offset—recommended for clean clearance through the Genesis Competition Arrow Rest—and can also be set straight when desired. The micro-adjustable tower allows fine-tuning of clamp position for accurate, repeatable vane placement on any arrow, while the integrated arrow tip holder keeps the shaft fully seated throughout the fletching process.
Each Genesis Fletching Jig is precision-milled for long-term durability and alignment and paired with a 3-inch solid-steel clamp engineered for consistent pressure and vane adhesion. Rigid construction and tight machining tolerances deliver dependable precision, arrow after arrow.
Lead Time: 3 week(s)
- Compatible with any arrow diameter, standard nock styles, and vanes or feathers up to 3 inches
- Precision 1.5° left or right offset, plus straight configuration
- Micro-adjust clamp centering for precise vane placement
- 3-inch solid steel clamp for durability and consistent vane adhesion
- Integrated arrow tip holder to keep the shaft fully seated in the nock receiver during fletching
- Laser-etched reference markings for Genesis-approved vane height and maximum 3-inch length
- Dedicated receiver alignment mark for precise 1-inch vane placement from the nock throat
- Indexed 1-2-3 nock receiver for true 3-fletch rotation and Genesis 1820 arrow color configuration
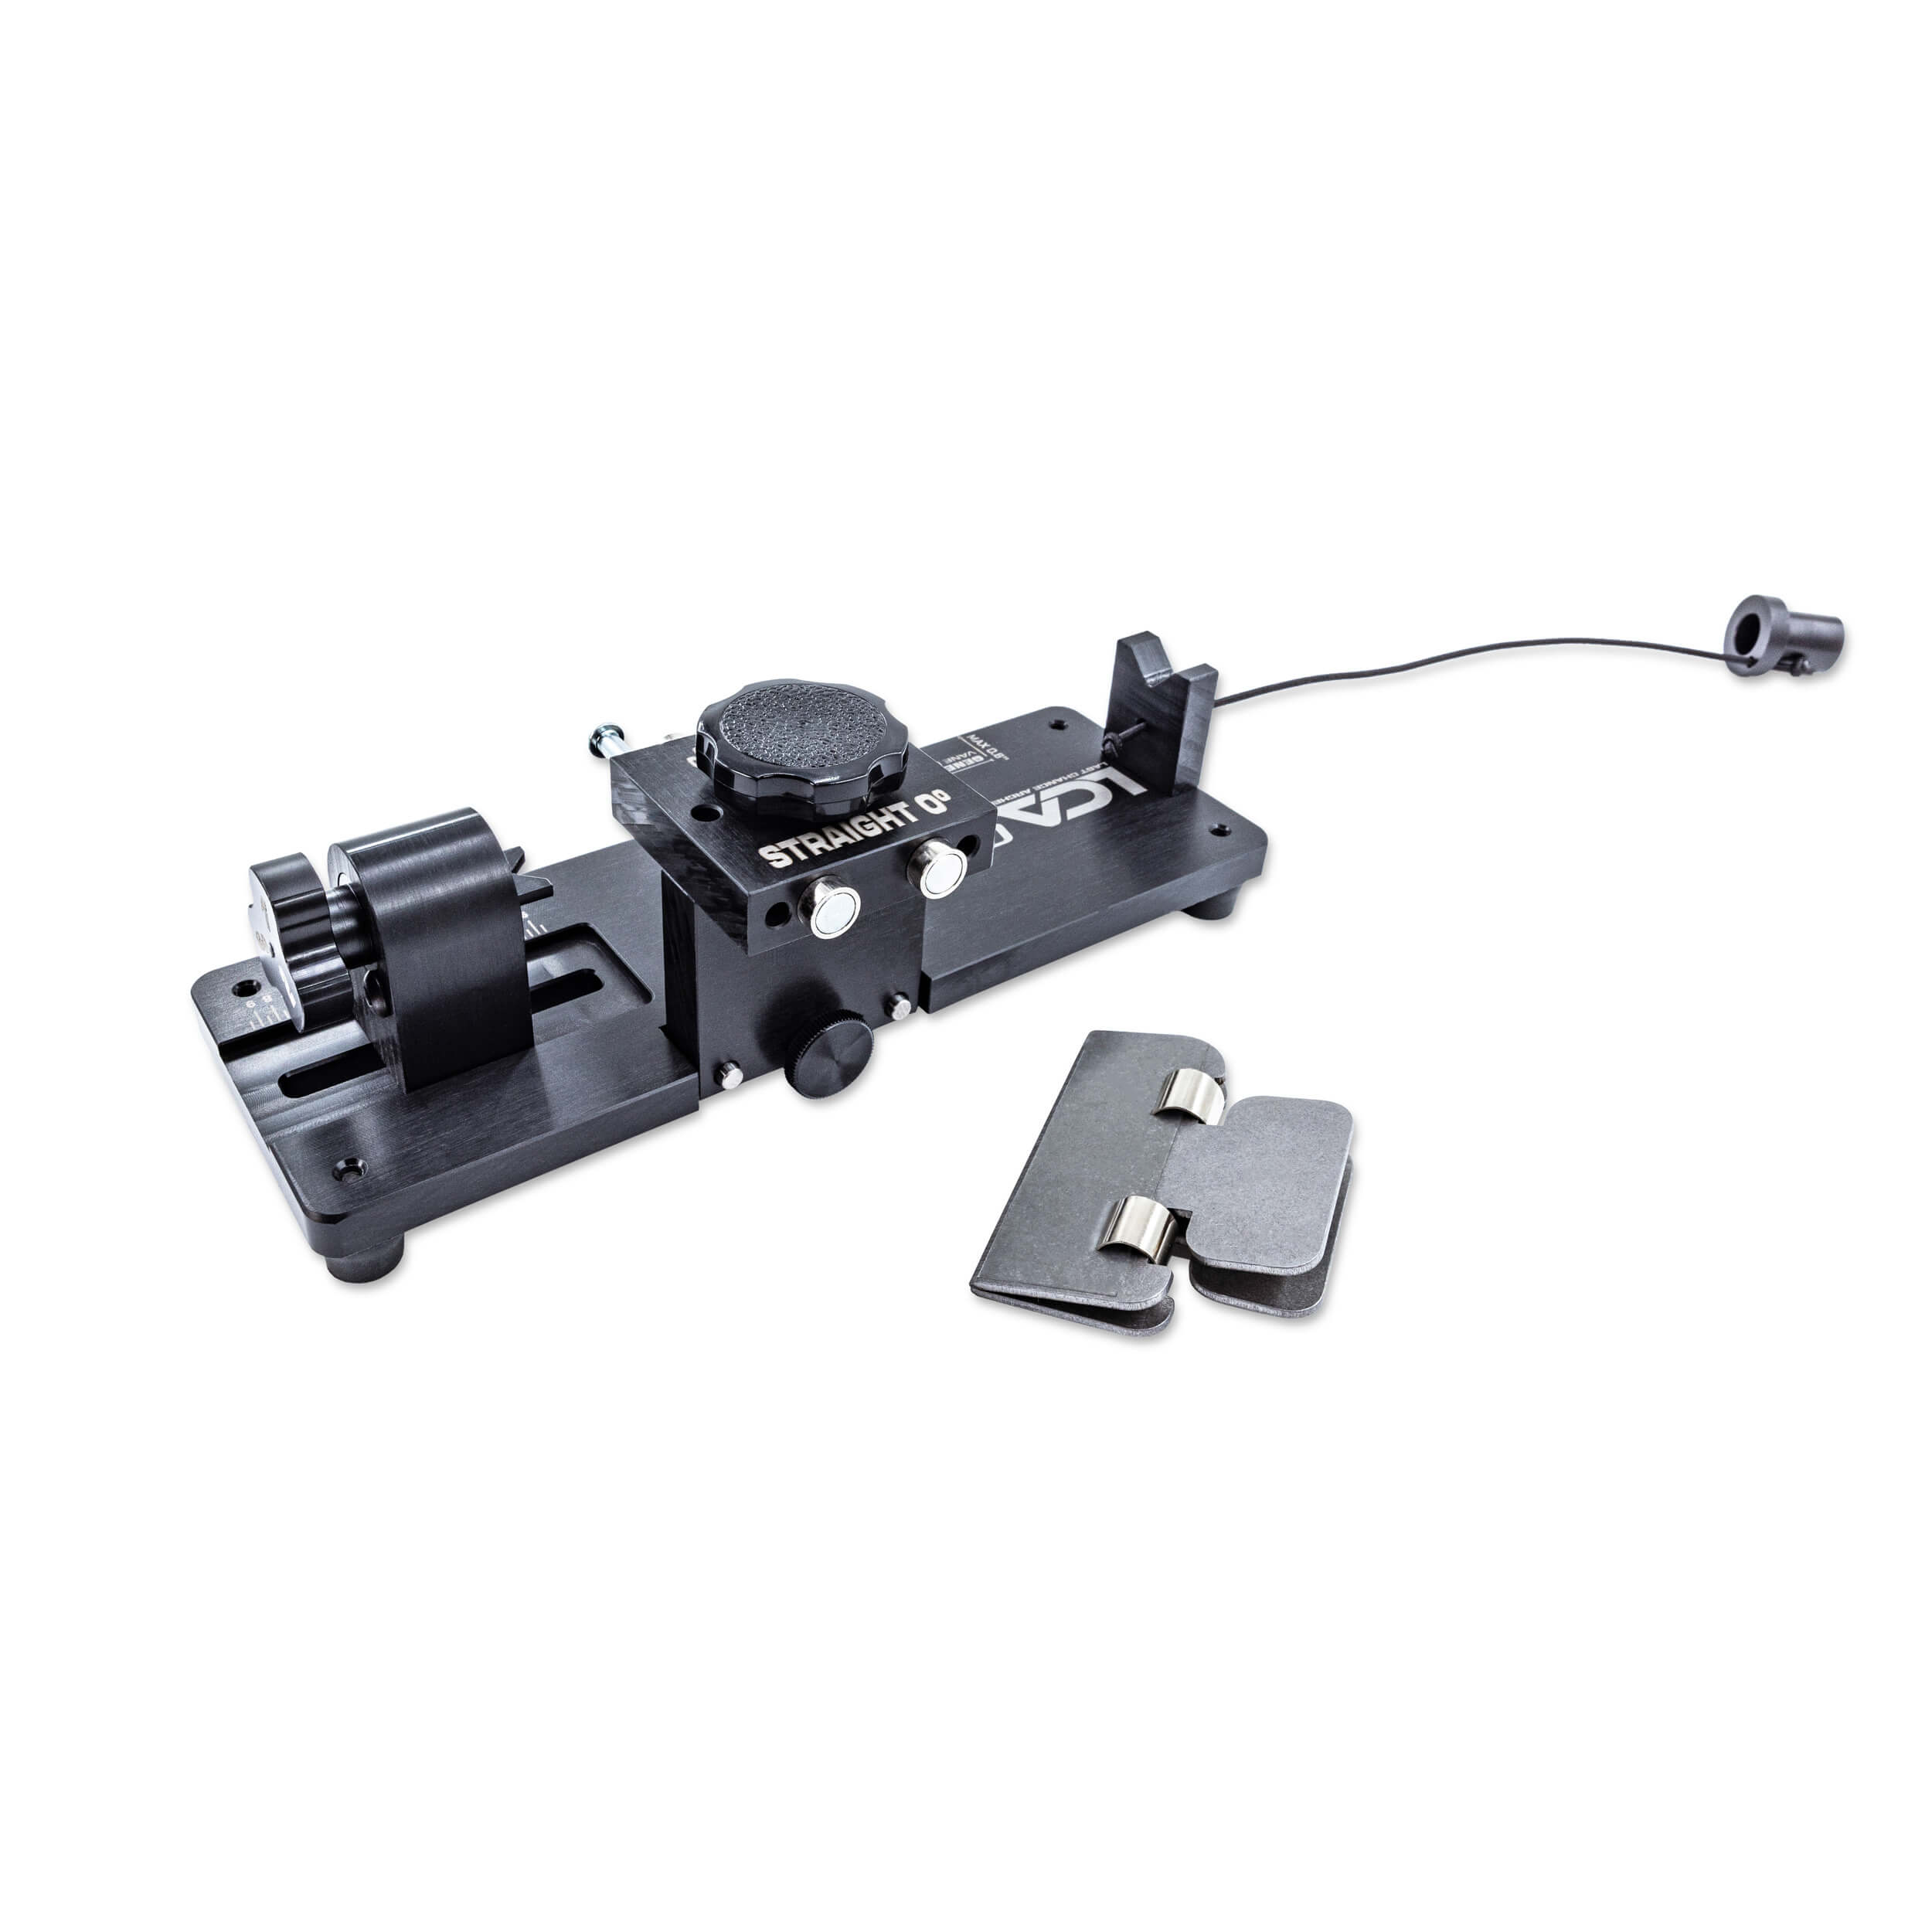
- 1 qty. Genesis Fletching Jig Base Assembly
- 1 qty. Nock Receiver
- 1 qty. Nock Receiver Thumb Screw
- 1 qty. 3” Steel Clamp
- 1 qty. Clamp Alignment Pin
- 1 qty. Arrow Tip Holder + Bungee Cord
- 1 qty. Thumb Knob
- All arrow shaft diameters
- All arrow shaft materials (carbon & aluminum)
- All (standard) nock types
- Vanes and feathers up to 3 inches in length
- 3 fletch configuration
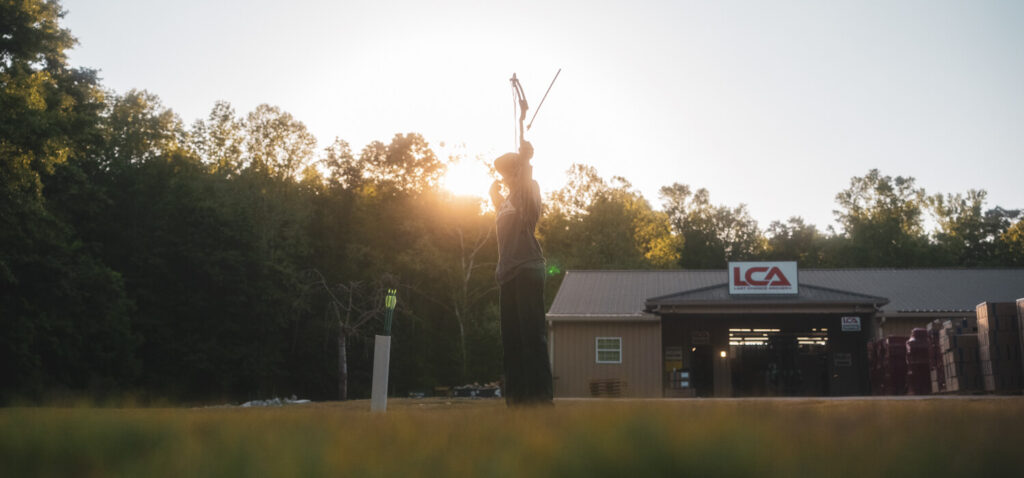
Proper vane placement, consistent alignment, and reliable clearance are the foundation of every accurate arrow build. Precision builds confidence. Whether you’re maintaining a Genesis setup or building arrows for a variety of bows and arrow configurations, the Genesis Fletching Jig keeps your process simple, repeatable, and reliable — so you can spend less time adjusting and more time shooting.
American Made
The Genesis Fletching Jig is proudly manufactured in our facility located in the state of Georgia, USA.
Built with Purpose
The Genesis Fletching Jig was built with one purpose in mind: to make arrow maintenance precise, consistent, and hassle-free. Designed for repeatable, guideline-driven vane placement right out of the box, it also incorporates Genesis-specific references to simplify Genesis 1820 arrow setups without limiting overall versatility.
Precision-Milled Design
Precision-milled components provide exact fits and flawless function on the Genesis Fletching Jig, reinforcing LCA’s standard for professional-grade craftsmanship.
Built to Last
Each Genesis Fletching Jig is made from premium materials and features precision craftsmanship. Designed to create consistent, repeatable fletching jobs, time after time.
Official Instruction Guide — Genesis Fletching Jig
Overview
The Genesis Fletching Jig is designed to deliver fast, repeatable vane placement with minimal setup. An indexed nock receiver ensures consistent rotation and spacing, while micro-adjust vane positioning allows precise clamp alignment along the shaft. A built-in arrow tip holder keeps the shaft fully seated, and selectable offset or straight configurations provide flexibility across any arrow setup.
What’s Included
1 qty. Genesis Fletching Jig Base Assembly
1 qty. Nock Receiver
1 qty. Nock Receiver Thumb Screw
1 qty. 3” Steel Clamp
1 qty. Clamp Alignment Pin
1 qty. Arrow Tip Holder + Bungee Cord
1 qty. Thumb Knob
Preparation
Clean the arrow shaft thoroughly using Arrow & Vane Fletching Activator, Alcohol, or Acetone
Remove any old adhesive or residue if re-fletching
Spray the shaft, then remove any residue, dust, and dirt; either a microfiber towel or a paper towel works best.
Ensure the shaft surface is completely dry before applying vanes
Lightly scuff the shaft surface if needed for improved adhesion (optional, depending on vane/shaft type)
Initial Setup & Configuration
Insert the arrow shaft into the jig and ensure it is fully seated in the nock receiver groove.
Secure the arrow using the arrow tip holder and bungee cord to prevent arrow movement during fletching.
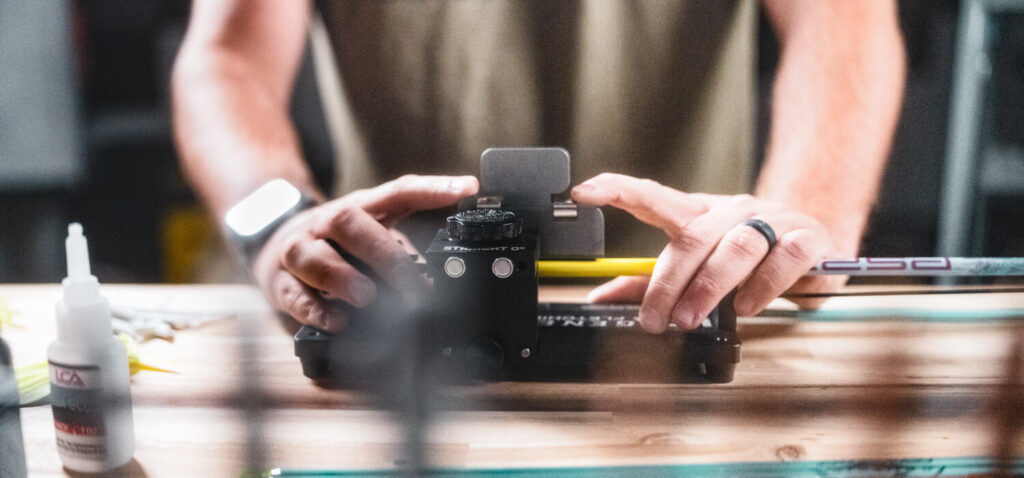
Nock Receiver Positioning & Vane Location
The nock receiver can be adjusted forward or backward along the base to control the distance between the nock and vane.
Loosen the thumb screw from the bottom of the nock receiver under the base
Adjust the nock receiver forward or back until the desired position is reached
Tighten the thumb screw to lock the nock receiver down
Position the nock receiver based on your preferred vane location along the shaft
Adjust forward or backward to achieve proper clearance, tuning preference, or shooting comfort
For Genesis arrow builds:
Adjust vane placement distance by sliding the nock receiver forward or backward along the base.
Align the front edge of the nock receiver with the designated Genesis reference mark
This ensures vane placement meets Genesis competition specifications (1″ from the nock throat to the top edge of the vane)
Use an index vane (cock vane) that differs in color
Position the index vane in the #1 position on the indexed receiver
Place the remaining matching vanes in positions #2 and #3
This places the index vane at 90º specifically for the Genesis Archer
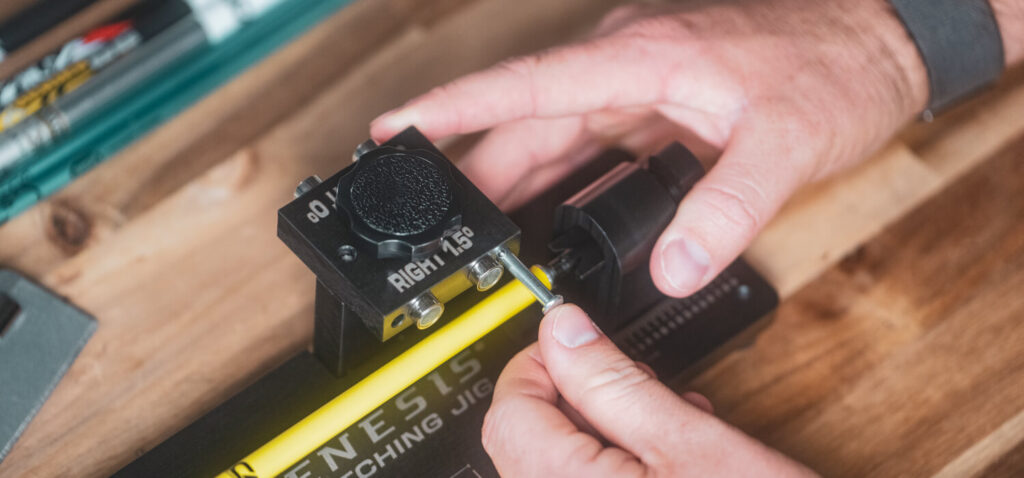
Offset Adjustment
Right 1.5° offset
Left 1.5° offset
Straight 0º offset
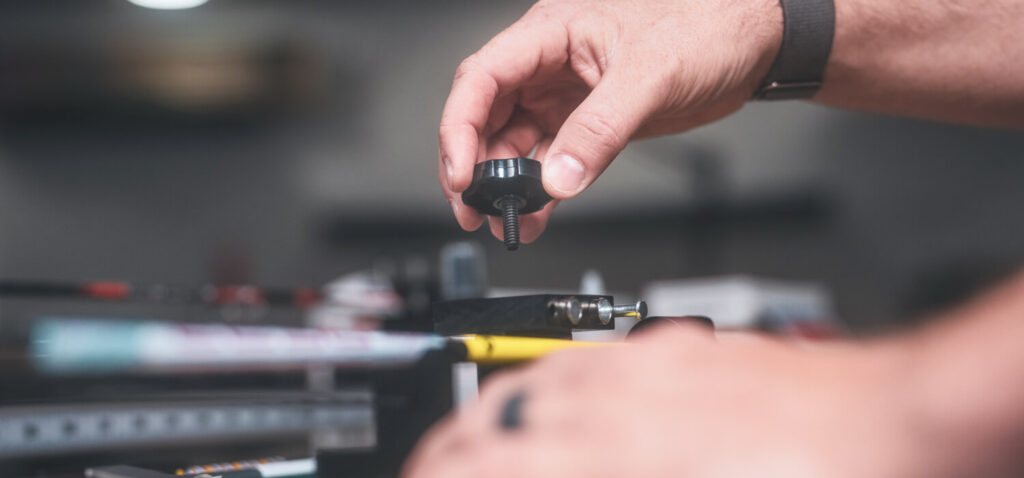
Remove the locking thumb knob to adjust
Reposition the jig head to the desired setting
Position the block with the laser-engraved text of the offset you chose, towards the arrow
Reinstall the clamp alignment pin in the offset block, using the hole closest to the nock receiver on the chosen side.
Reinstall and secure the thumb knob
For Genesis arrow builds:
The recommended offset is 1.5º for clearance with the Genesis Competition Arrow Rest
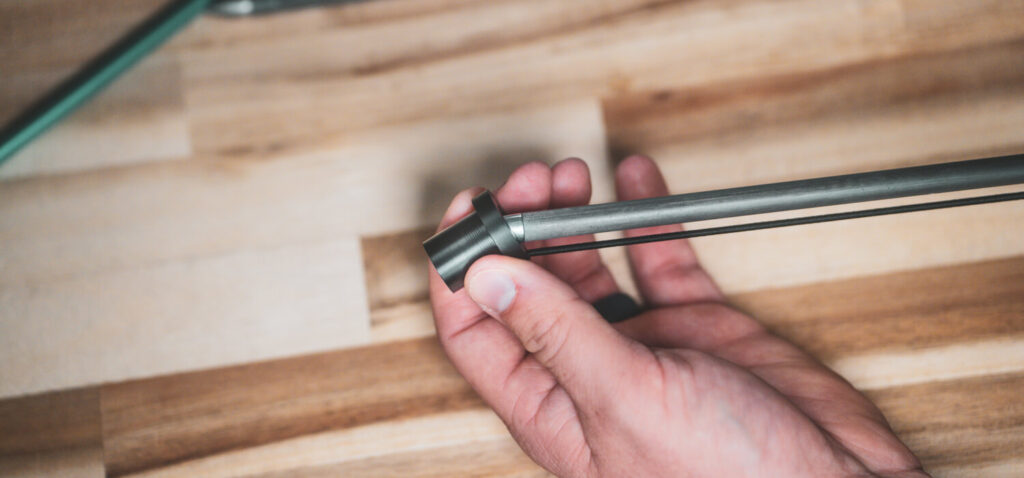
Using the clamp alignment pin
When putting the clamp onto the jig, first position the clamp on the tower magnets
Slide the clamp up against the alignment pin before pressing the clamp down to the arrow shaft
This ensures:
Identical vane placement on every arrow
Consistent spacing and alignment
Repeatable results across builds
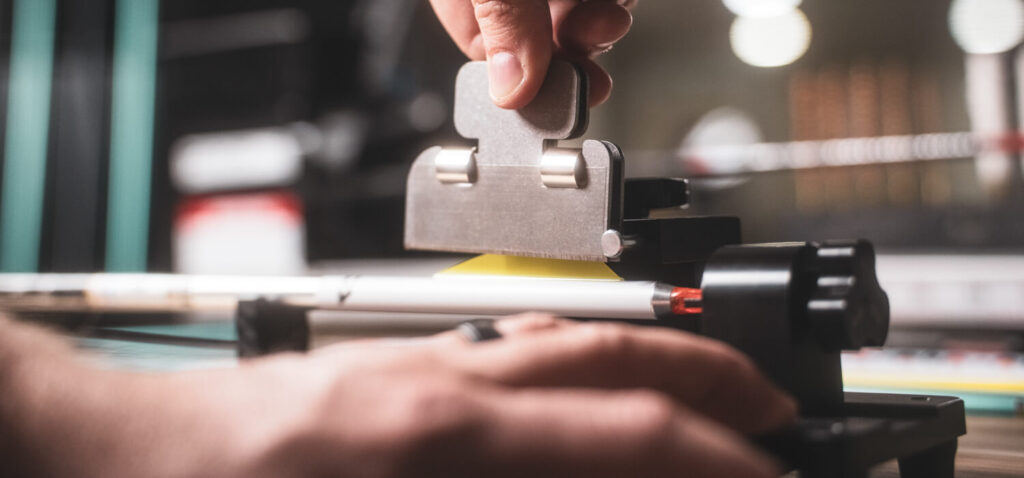
Micro-Adjust Vane Positioning
Use the micro-adjust knob to fine-tune vane alignment
Place a vane in the clamp
Attach the clamp to the jig
Adjust the knob in or out to center the vane along the shaft
This ensures precise vane to shaft alignment for a secure bond
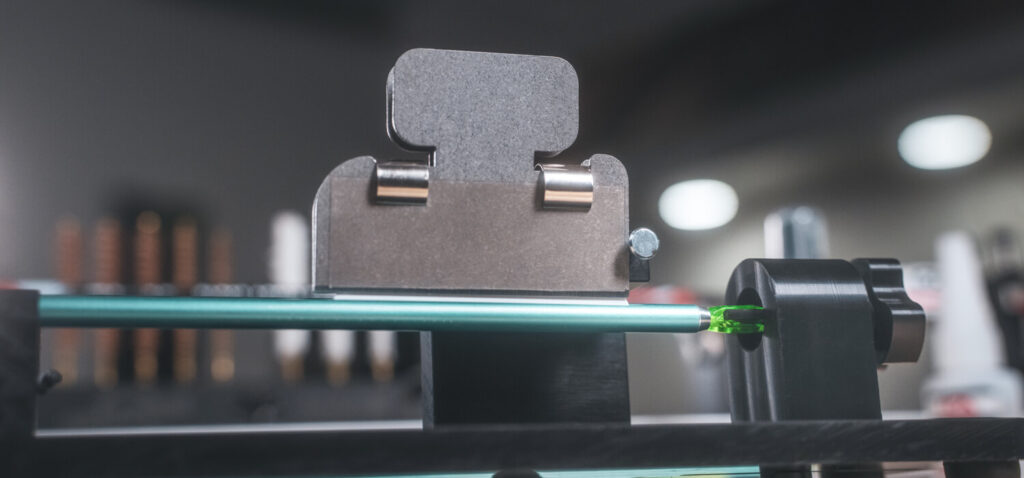
Fletching Operation
Place a vane into the clamp, ensuring it is fully seated. Align the vane with the end of the clamp closest to the nock receiver.
Apply a controlled amount of arrow & vane fletching glue
Use small dots along the vane base
Spread evenly for full contact
Avoid excess vane adhesive to prevent mess and buildup
Follow the vane manufacturer’s recommendations for:
Surface prep
Primer use (if required)
Adhesive compatibility
Position the clamp on the tower magnets and adjust it until it seats against the alignment pin.
Press the clamp down firmly against the shaft, ensuring it remains aligned with the alignment pin.
Hold steady pressure for the adhesive manufacturer’s recommended set time.
Carefully remove the clamp by compressing the ears, opening the clamp, and removing it without shifting the vane.
Wipe any excess glue off the clamp base immediately to avoid a mess.
Rotate the indexing knob to the next vane position.
Repeat the process for the remaining vanes.
Vane Sizing Scale
For Genesis arrow builds:
Use the laser-engraved reference marks on the jig base to verify that the vane length and height meet Genesis requirements.
Replacing a Single Vane
Remove the damaged vane completely, ensuring all old adhesive is cleaned off the shaft
Clean the exposed shaft area thoroughly with arrow cleaner, alcohol, or Acetone, and allow it to dry
Place the arrow back into the jig, ensuring it is fully seated and aligned
Rotate the indexing knob until the open vane position aligns with the clamp location
Verify alignment by checking that the remaining vanes match the jig’s indexed positions
If the nock has been turned while shooting, slight guesswork might be needed to position the vane in the correct spot on the shaft, or you can tear off the other remaining vanes and refletch the arrow as a whole.
Insert the new vane into the clamp and apply fletching glue as normal
Attach the clamp to the magnets, slide it against the alignment pin, compress, and hold for the proper set time
Remove the clamp carefully and allow for a full cure before shooting the arrow shaft
Dry Time & Final Inspection
Allow arrows to fully cure based on adhesive manufacturer recommendations
Inspect each vane to ensure straight alignment and full adhesion
Consistency & Repeatability
Once your settings are established:
Record your setup position (block location, offset, vane position)
Return to the same settings for future builds
Maintain identical results across multiple arrows
Key Benefits
Fast, simple setup
Repeatable vane placement
Micro-adjust precision control
Built-in Genesis compliance references
Compatible with virtually any arrow, vane, or nock setup
Tips for Best Performance
Apply consistent pressure when using the clamp arm
Always confirm alignment before applying fletching glue
Keep jig components clean to maintain precision
Allow full cure time before shooting
For issues with excessive vane fletching glue on the clamp, use less glue and apply a thin layer of bowstring wax on the base of the clamp to help prevent glue from sticking
Troubleshooting
Vane misaligned — Check that the shaft is fully seated and the indexing knob is locked
Indexing not lining up — Ensure the shaft has not rotated during setup
Fletching glue & vane adhesive not curing — Check expiration date
Vane lifting — Apply slightly more adhesive at the front and rear of the vane
Vane fell off — Check glue location: if glue is on the vane but not the shaft, the shaft was not properly cleaned; if glue is on the shaft but not the vane, the vane may require cleaning prior to installation, depending on the vane manufacturer
Maintenance
Clean the clamp and jig regularly to prevent adhesive buildup
Remove dried glue from contact surfaces
Store in a dry, clean environment
Support
Your journey doesn’t end at checkout—and neither does our support. If you have any questions, reach out to the Last Chance Archery team—we’re here to help.
Videos
Fletching Made Easy with the Genesis Fletching Jig
Arrow fletching made easy.
Simple, precise, and repeatable.
One jig—from beginner to advanced.

How to Fletch Arrows with the Genesis Fletching Jig | Tips & Setup Guide
Learn how to fletch arrows with the Genesis Fletching Jig for precise, repeatable vane placement.
From setup to finished arrow, this guide walks through the full process to help you build consistent, high-quality arrows every time.
In this video, we cover jig setup, arrow positioning, clamp alignment, and vane placement to help you achieve clean, repeatable results across any arrow setup.
What you’ll learn:
• Proper jig setup
• Arrow positioning and clamp alignment
• Offset vs straight configuration
• Micro-adjust vane positioning
• Tips for clean, repeatable vane adhesion
The Genesis Fletching Jig is compatible with virtually any arrow setup and is designed to simplify arrow building while delivering precise, repeatable results.
Additional information
| Weight | 2 lbs |
|---|---|
| Dimensions | 11 × 5 × 4 in |
| Product Lead Time (Wks) | 3 |
5 reviews for Genesis Fletching Jig
Micro-adjustable tower for precise vane centering
Precision Milled Construction
Accuracy You Can See
Any arrow diameter, any standard nock
3" Solid Steel Clamp

No Guesswork Required
Exact 3-Fletch Indexing
Genesis tailored setup marks
Precision Made Simple
Genesis approved
1.5º offset left, right, or straight fletching options
Built for any archer
No Setup. Just Fletch.
Consistency You Can Trust
Built for Tighter Groups
Repeatable Results
Any Arrow. Any Setup.
Out of the Box. Arrow Ready.
- Weight: 1lb
- Clamp Length: 3”
- Color: Black
- Base Material: Delrin
- Clamp Material: Galvanized Steel
- Overall Dimensions: 9” Length x 3” Width x 3.5” Height
- Tower Adjustments: Micro-Adjustable
Additional information
| Weight | 2 lbs |
|---|---|
| Dimensions | 11 × 5 × 4 in |
| Product Lead Time (Wks) | 3 |
- Warranty Period
- 1 Year
- Coverage
- Full Product (except excluded items)
- Excluded Items
- Arrow tip holder bungee cord.
Clamp alignment pin.
The thumb knob & thumb screw plastic heads.
5 reviews for Genesis Fletching Jig
-
I have used the vane master pro for several years now, was in the market to try something a little different. This little inexpensive jig is so easy to setup and use. A couple twists of a knob and a look down that shaft and your aligned. I fletched half a dozen arrows in half the time with less glue mess and a very consistent professional job I except from LCA. Thank yall very much! I look forward to teaching my 2 girls how to fletch with this jig!
-
I started shooting archery in the early 90’s and was fletching my own arrows shortly there after. I have used almost all the fletchers on the market with the Bitz and OMP Phoenix (with AAE Knob) being my most used. I recently spoke with Aaron from Centershot Ministries and was introduced to this new fletching jig. I ordered one the day it became available and wow, its a game changer!!! Super easy and fast set up, and perfect repeatable accuracy. This is just not for Genesis, i use it to fletch all my tournament arrows and just did a dozen ps23’s in record time. This fletching jig should receive serious consideration from anyone who fletches their own arrows. Everyone involved hit it out of the park on the design, it’s amazing!
-
When I decided to start fletching my own arrows I was overwhelmed with all of the different fletching jigs on the market. When I came across the genesis jig I was very impressed with how easy it looked on video. I jumped in and purchased the jig, with out any prior experience fletching arrows I was able to get right to it with this jig. It truly was as easy as advertised and made flexing my arrows a breeze. As a machinist I always look at the fit and finish of products, and this jig is nothing shy of spectacular. The parts all work as intended and are very durable and comfortable to the touch. I can’t say enough of how great this product is and look forward to using it as much as possible.
-
Having cut my teeth on the Bitz (with AAE Knob) and then the OMP Phoenix (with AAE Knob), I saw this at the 2026 NASP Eastern Nationals, spoke to its creator Mr. Aaron Scheer from Centershot, and bought two of them. The hardest aspect I’ve had fletching NASP arrows is positively ensuring the straight 1.5 degree right off-set that is critical for Genesis arrows using the Competition Rest. With this jig, we don’ have to worry about our Bitz set screws loosening and losing the offset, or compromising with the OMP whole number offset. Our NASP coaches can easily share this jig and know it will always fletch exactly how we need it. – Howell Public Schools, Michigan
-
I bought this jig on a whim at TN TAC after seeing GRIV’s review one day earlier. Shipping was QUICK. I immediately stripped 36 arrows I’d screwed up with another jig and re-fletched with the Genesis. I’m not a fan of fletching arrows, but feel it’s a necessity. Even I couldn’t mess it up with this jig. I had 36 budget arrows grouping at 100 yds with arrows that matched each other as perfectly as a human can get them. Just put the vane on the edge of the clamp, no lines to try and get the vane even with. Get your nock to vane distance on the base of the jig. I’m really liking it.
You may also like…
Related Products
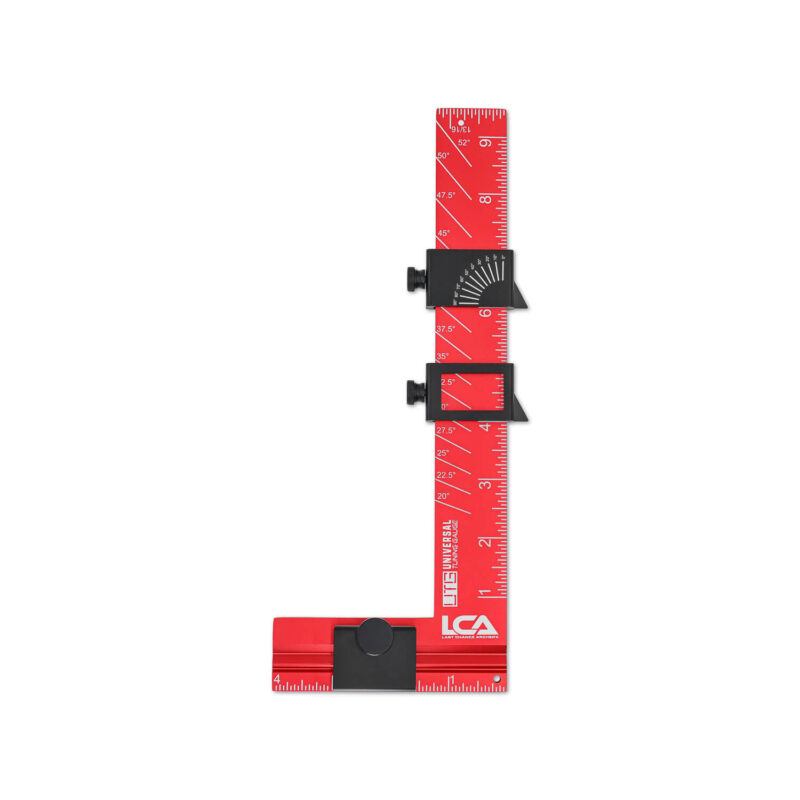
Universal Tuning Gauge
The Universal Tuning Gauge is for serious archers and bow technicians. It’s…
$69.00
Arrow Wraps - Solid Series
Our solid color arrow wraps deliver a clean, consistent look while maintaining…
$25.50
Arrow Wraps - Tactical Series
Tactical Series arrow wraps feature darker, subdued colors inspired by popular bow…
$25.50
Arrow Wraps - Ignite Series
Ignite Series arrow wraps feature bold, high-visibility colors inspired by popular bow…
$25.50
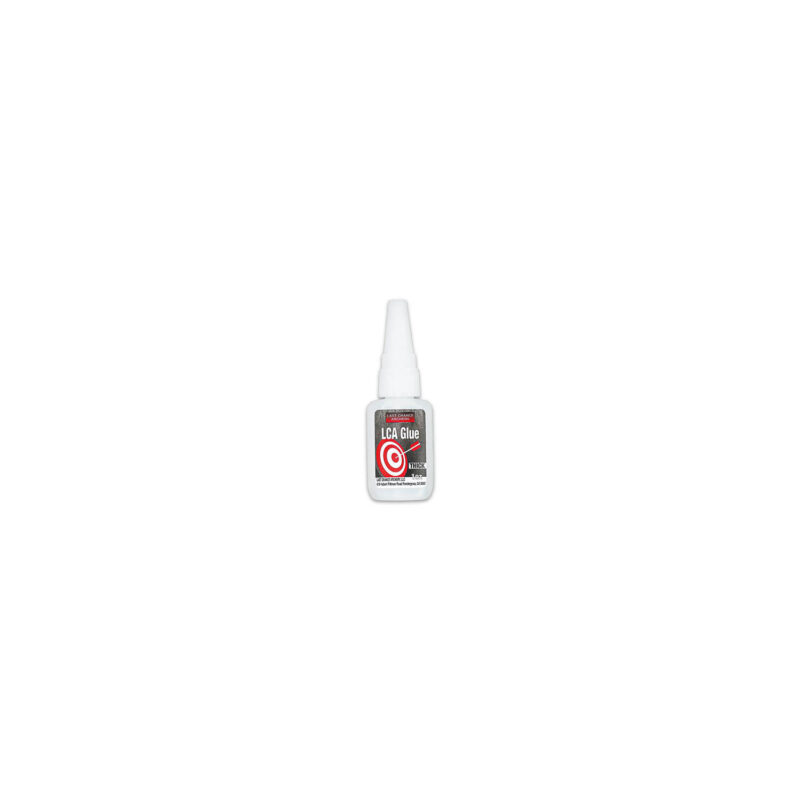
LCA Arrow & Vane Fletching Glue
LCA Glue is a high-performance adhesive specially formulated for archery and various…
$14.00
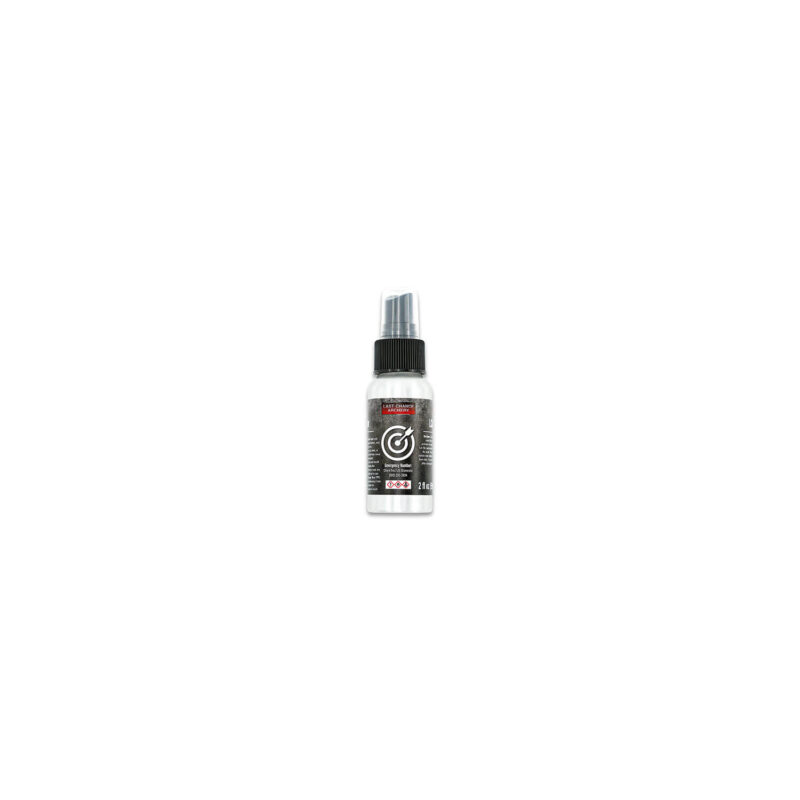
LCA Arrow & Vane Fletching Glue Activator
LCA Activator is a versatile product designed to enhance the fletching process…
$16.00

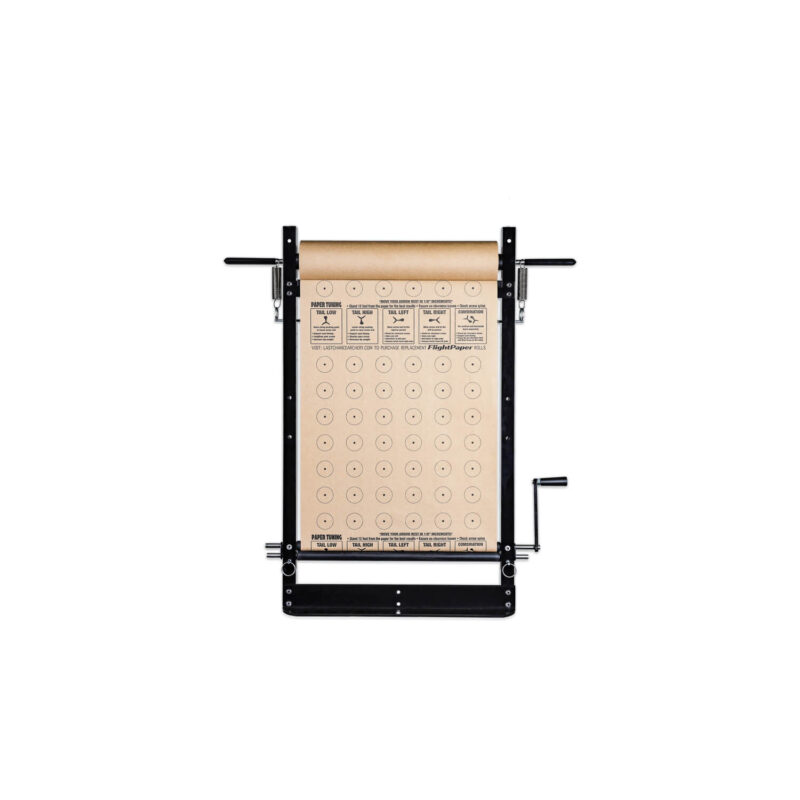
FlightPaper
FlightPaper rolls are designed for precise paper tuning—producing clean, visible tears that…
$34.00
FlightCheck
Paper tuning shouldn’t be a chore—it should be simple, accurate, and efficient.…
From: $289.00
Revolution Arrow Saw - 115V
The Revolution Arrow Saw is a complete arrow-cutting station designed for precision,…
$599.00
LCA Arrow Stand
The LCA Arrow Stand is an excellent addition to your arrow-building station.…
$60.00

Precision Arrow Prep Kit - Handheld
The Precision Arrow Prep Kit is ideal for archers who build arrows…
$32.00
Precision Arrow Prep Kit - Bench Mount
The Precision Arrow Prep Kit is ideal for archers who build arrows…
$52.00

Fletching Jig - Vane Master Pro
The Vane Master PRO is a precision-engineered fletching tool built for archers…
$350.00
Arrow Wraps - GPS Coordinates
LCA arrow wraps bring a new level of convenience, value, and precision…
$25.50
Arrow Wraps - Daybreak Skull
LCA arrow wraps bring a new level of convenience, value, and precision…
$25.50
Arrow Wraps - Vegas Indoor
LCA arrow wraps bring a new level of convenience, value, and precision…
$25.50

Arrow Wraps - Old Glory Fade
LCA arrow wraps bring a new level of convenience, value, and precision…
$17.00
Arrow Wraps - Tuner's Grid
LCA arrow wraps bring a new level of convenience, value, and precision…
$25.50
Arrow Wraps - Diamonds Drift
LCA arrow wraps bring a new level of convenience, value, and precision…
$25.50
Arrow Wraps - Rack & Stack
LCA arrow wraps bring a new level of convenience, value, and precision…
$25.50
Arrow Wraps - Velocity Chevron
LCA arrow wraps bring a new level of convenience, value, and precision…
$25.50
Arrow Wraps - Water Wave
LCA arrow wraps bring a new level of convenience, value, and precision…
$25.50

DEAD CENTER CUSTOMS (verified owner) –
I have used the vane master pro for several years now, was in the market to try something a little different. This little inexpensive jig is so easy to setup and use. A couple twists of a knob and a look down that shaft and your aligned. I fletched half a dozen arrows in half the time with less glue mess and a very consistent professional job I except from LCA. Thank yall very much! I look forward to teaching my 2 girls how to fletch with this jig!
Brandon Dhuey (verified owner) –
I started shooting archery in the early 90’s and was fletching my own arrows shortly there after. I have used almost all the fletchers on the market with the Bitz and OMP Phoenix (with AAE Knob) being my most used. I recently spoke with Aaron from Centershot Ministries and was introduced to this new fletching jig. I ordered one the day it became available and wow, its a game changer!!! Super easy and fast set up, and perfect repeatable accuracy. This is just not for Genesis, i use it to fletch all my tournament arrows and just did a dozen ps23’s in record time. This fletching jig should receive serious consideration from anyone who fletches their own arrows. Everyone involved hit it out of the park on the design, it’s amazing!
Daniel Moss –
When I decided to start fletching my own arrows I was overwhelmed with all of the different fletching jigs on the market. When I came across the genesis jig I was very impressed with how easy it looked on video. I jumped in and purchased the jig, with out any prior experience fletching arrows I was able to get right to it with this jig. It truly was as easy as advertised and made flexing my arrows a breeze. As a machinist I always look at the fit and finish of products, and this jig is nothing shy of spectacular. The parts all work as intended and are very durable and comfortable to the touch. I can’t say enough of how great this product is and look forward to using it as much as possible.
Ryan Mainz –
Having cut my teeth on the Bitz (with AAE Knob) and then the OMP Phoenix (with AAE Knob), I saw this at the 2026 NASP Eastern Nationals, spoke to its creator Mr. Aaron Scheer from Centershot, and bought two of them. The hardest aspect I’ve had fletching NASP arrows is positively ensuring the straight 1.5 degree right off-set that is critical for Genesis arrows using the Competition Rest. With this jig, we don’ have to worry about our Bitz set screws loosening and losing the offset, or compromising with the OMP whole number offset. Our NASP coaches can easily share this jig and know it will always fletch exactly how we need it. – Howell Public Schools, Michigan
John Bradley Dickens –
I bought this jig on a whim at TN TAC after seeing GRIV’s review one day earlier. Shipping was QUICK. I immediately stripped 36 arrows I’d screwed up with another jig and re-fletched with the Genesis. I’m not a fan of fletching arrows, but feel it’s a necessity. Even I couldn’t mess it up with this jig. I had 36 budget arrows grouping at 100 yds with arrows that matched each other as perfectly as a human can get them. Just put the vane on the edge of the clamp, no lines to try and get the vane even with. Get your nock to vane distance on the base of the jig. I’m really liking it.